Nano Banana Pro Prompting Guide: How to Get Better Results Without Overcomplicating Your Prompts
Long Nano Banana prompts can work perfectly, but most images do not need one. We tested both approaches and looked at which instructions made a difference.

Nano Banana prompting is not complicated. You describe the image, attach references if you need them and correct whatever the model gets wrong.
People still turn normal prompts into 6,000-character documents describing pores, skull geometry, fabric stitching, camera sensors and ten different types of realism. Sometimes that level of detail has a purpose. Most images do not need it.
We tested a short prompt against a structured character prompt of more than 6,000 characters. Both worked. Neither set was completely consistent, and the long prompt did not produce a clear improvement in image quality.
So what did all that extra text give us?
Mostly more control.
Quick Answer
Nano Banana is a simple tool like any other. Don’t overspecify your prompts, and try to keep each block to one or two straightforward sentences. Nano doesn’t need GPT-generated, zero-value text. Long prompts are fine as long as every part has a job and nothing contradicts or overconstrains the model.
1. How Does Nano Banana Read a Prompt?
Nano Banana reads your text, reference images and previous edits as one request. From that information, it has to work out what the final image should look like.
Google does not publish a strict internal hierarchy where the first instruction always wins. If one block asks for a casual smartphone photo and another asks for a polished medium-format fashion campaign, the model has to combine two different directions.
The model may follow both badly instead of choosing one correctly.
Google gives this basic structure for text-to-image prompts:
Subject + Action + Location or context + Composition + Style
For generations using reference images, Google suggests:
Reference images + Relationship instruction + New scenario
These are useful structures, not required syntax. A normal image can still be described in one paragraph. Complicated images benefit from separate blocks.
Google also recommends concrete details, positive descriptions, camera direction and follow-up prompts in its official Nano Banana prompting guide.
Pro tip: Check whether your visual directions agree with each other. “Candid smartphone photo,” “cinematic editorial,” “cheap disposable camera” and “medium-format studio portrait” should not all appear in the same prompt unless you have a clear reason for each one.
2. What Is the Best Nano Banana Prompt Hierarchy?
There is no confirmed internal Nano Banana prompt hierarchy. This is the order we use because it keeps the request clear:
- Operation: Create, edit, replace, remove or preserve.
- Reference roles: Explain what each attached image controls.
- Subject: Describe the main person, product or object.
- Action and scene: Explain what is happening and where.
- Composition: Set the angle, crop, pose and important positions.
- Lighting and look: Describe the light and general image style.
- Preservation: State what must remain unchanged during an edit.
- Output: Add the aspect ratio, resolution or format if needed.
You do not need all eight blocks for every prompt.
A normal text-to-image prompt can be this simple:
Create a candid smartphone photo of a 23-year-old Japanese-European man with shoulder-length blonde hair sitting in a quiet apartment at blue hour. He wears a plain white T-shirt and looks away from the camera. Chest-up framing, natural window light, realistic skin and mild phone-camera softness.
If the image needs more control, separate it into blocks. Keep each block short and focused on one part of the image.
Pro tip: Start with the operation. “Create,” “edit,” “replace,” “remove” and “preserve” immediately tell Nano Banana what kind of job it is doing.
3. Which Prompt Details Matter?
A useful detail changes something visible in the image.
Subject, clothing, action, location, framing, light, colour, materials and object placement can all make a clear difference.
“A woman in a kitchen” leaves most of the image to the model.
“A waist-up smartphone photo of a woman making coffee in a narrow 1990s apartment kitchen at 7 a.m., lit by one cold window” gives the model several clear decisions without overexplaining them.
Camera instructions can also matter:
- Low angle
- Eye-level portrait
- Overhead view
- Chest-up framing
- Wide environmental shot
- Close smartphone perspective
Generic praise does not provide the same control. Words such as “masterpiece,” “award-winning” and “highest possible quality” do not explain what the image should look like.
For text inside an image, put the exact wording in quotation marks and describe the typography. Google recommends this in its prompting guide.
If your interface has separate settings for aspect ratio and resolution, use them. There is no reason to hide a basic setting inside a large paragraph.
4. When Is a Long Prompt Worth Using?
Long prompts are useful when the image contains many specific relationships.
Imagine you need:
- A Chanel cup in the foreground
- One goth person in the background
- Another person wearing a furry costume
- All three people in exact positions
- A specific camera angle
- A defined lighting setup
- Certain objects preserved from a reference
That image needs more explanation than a man sitting alone in an apartment.
Long prompts also make sense for product campaigns, crowded scenes, infographics, exact typography, complicated edits and images where several references control different parts of the result.
The problem comes when long prompts start fusing several camera styles and visual directions. One block asks for a casual phone photo. Another mentions an 85 mm lens. The lighting block describes a studio campaign. The finishing block asks for disposable-camera quality.
Every instruction sounds reasonable alone, but together they describe several different images.
This is why we usually keep each block to one, two or three sentences. If the camera direction is already clear, stop describing it.
Reference images can also reduce how much text you need. If the face, body, product, outfit or composition is already visible, explain what the reference controls. You usually do not need to describe every visible detail again.
Google’s current documentation lists context windows far beyond a normal 6,000-character prompt for Nano Banana 2 and Nano Banana Pro. The model can receive the text. The question is whether the text helps it.
5. Short Prompt vs a 6,000-Character Character Prompt
A few hundred characters is still a normal prompt. We wanted to compare a short request against a proper prompt bible.
Both prompts requested the same basic image:
- A 23-year-old Japanese-European man
- Shoulder-length blonde hair
- A white T-shirt
- A quiet apartment
- Blue-hour lighting
- Chest-up framing
- A casual smartphone look
We generated three images with each prompt.
The short prompt
Create a candid smartphone photo of a 23-year-old Japanese-European man with shoulder-length blonde hair sitting in a quiet apartment at blue hour. He wears a white T-shirt and looks away from the camera. Chest-up framing, soft window light, realistic skin and natural phone-camera quality.
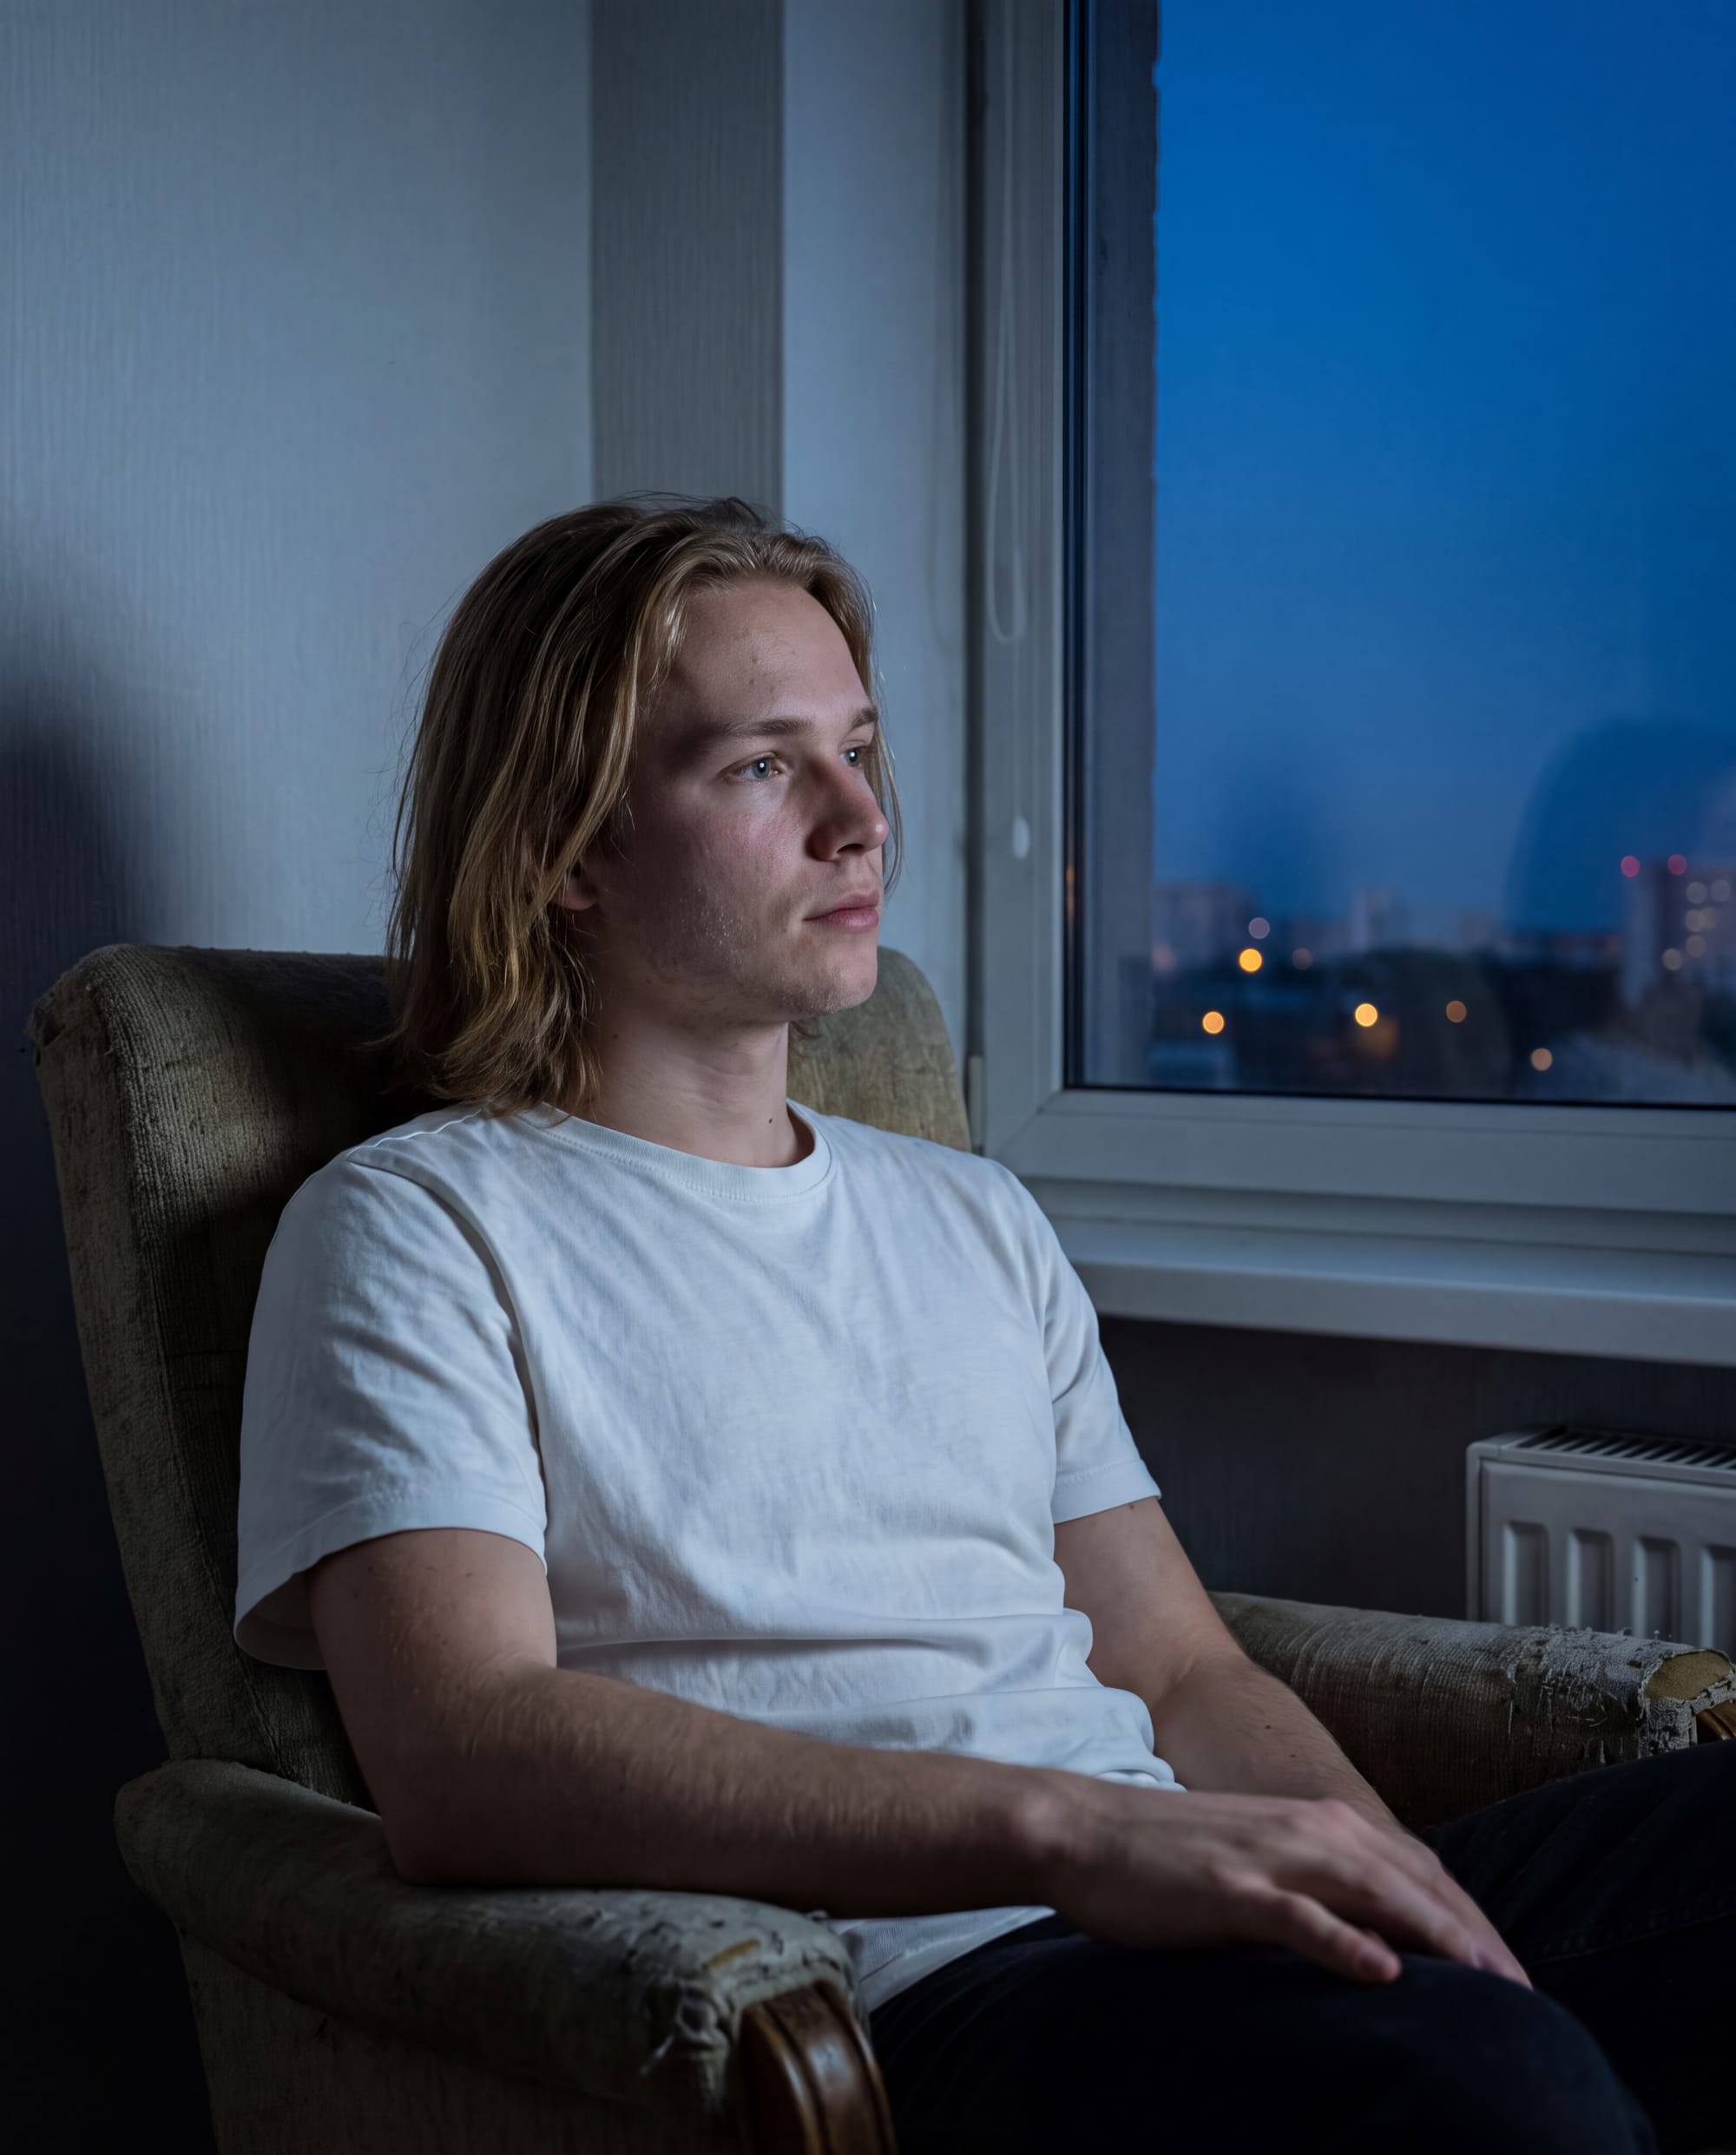
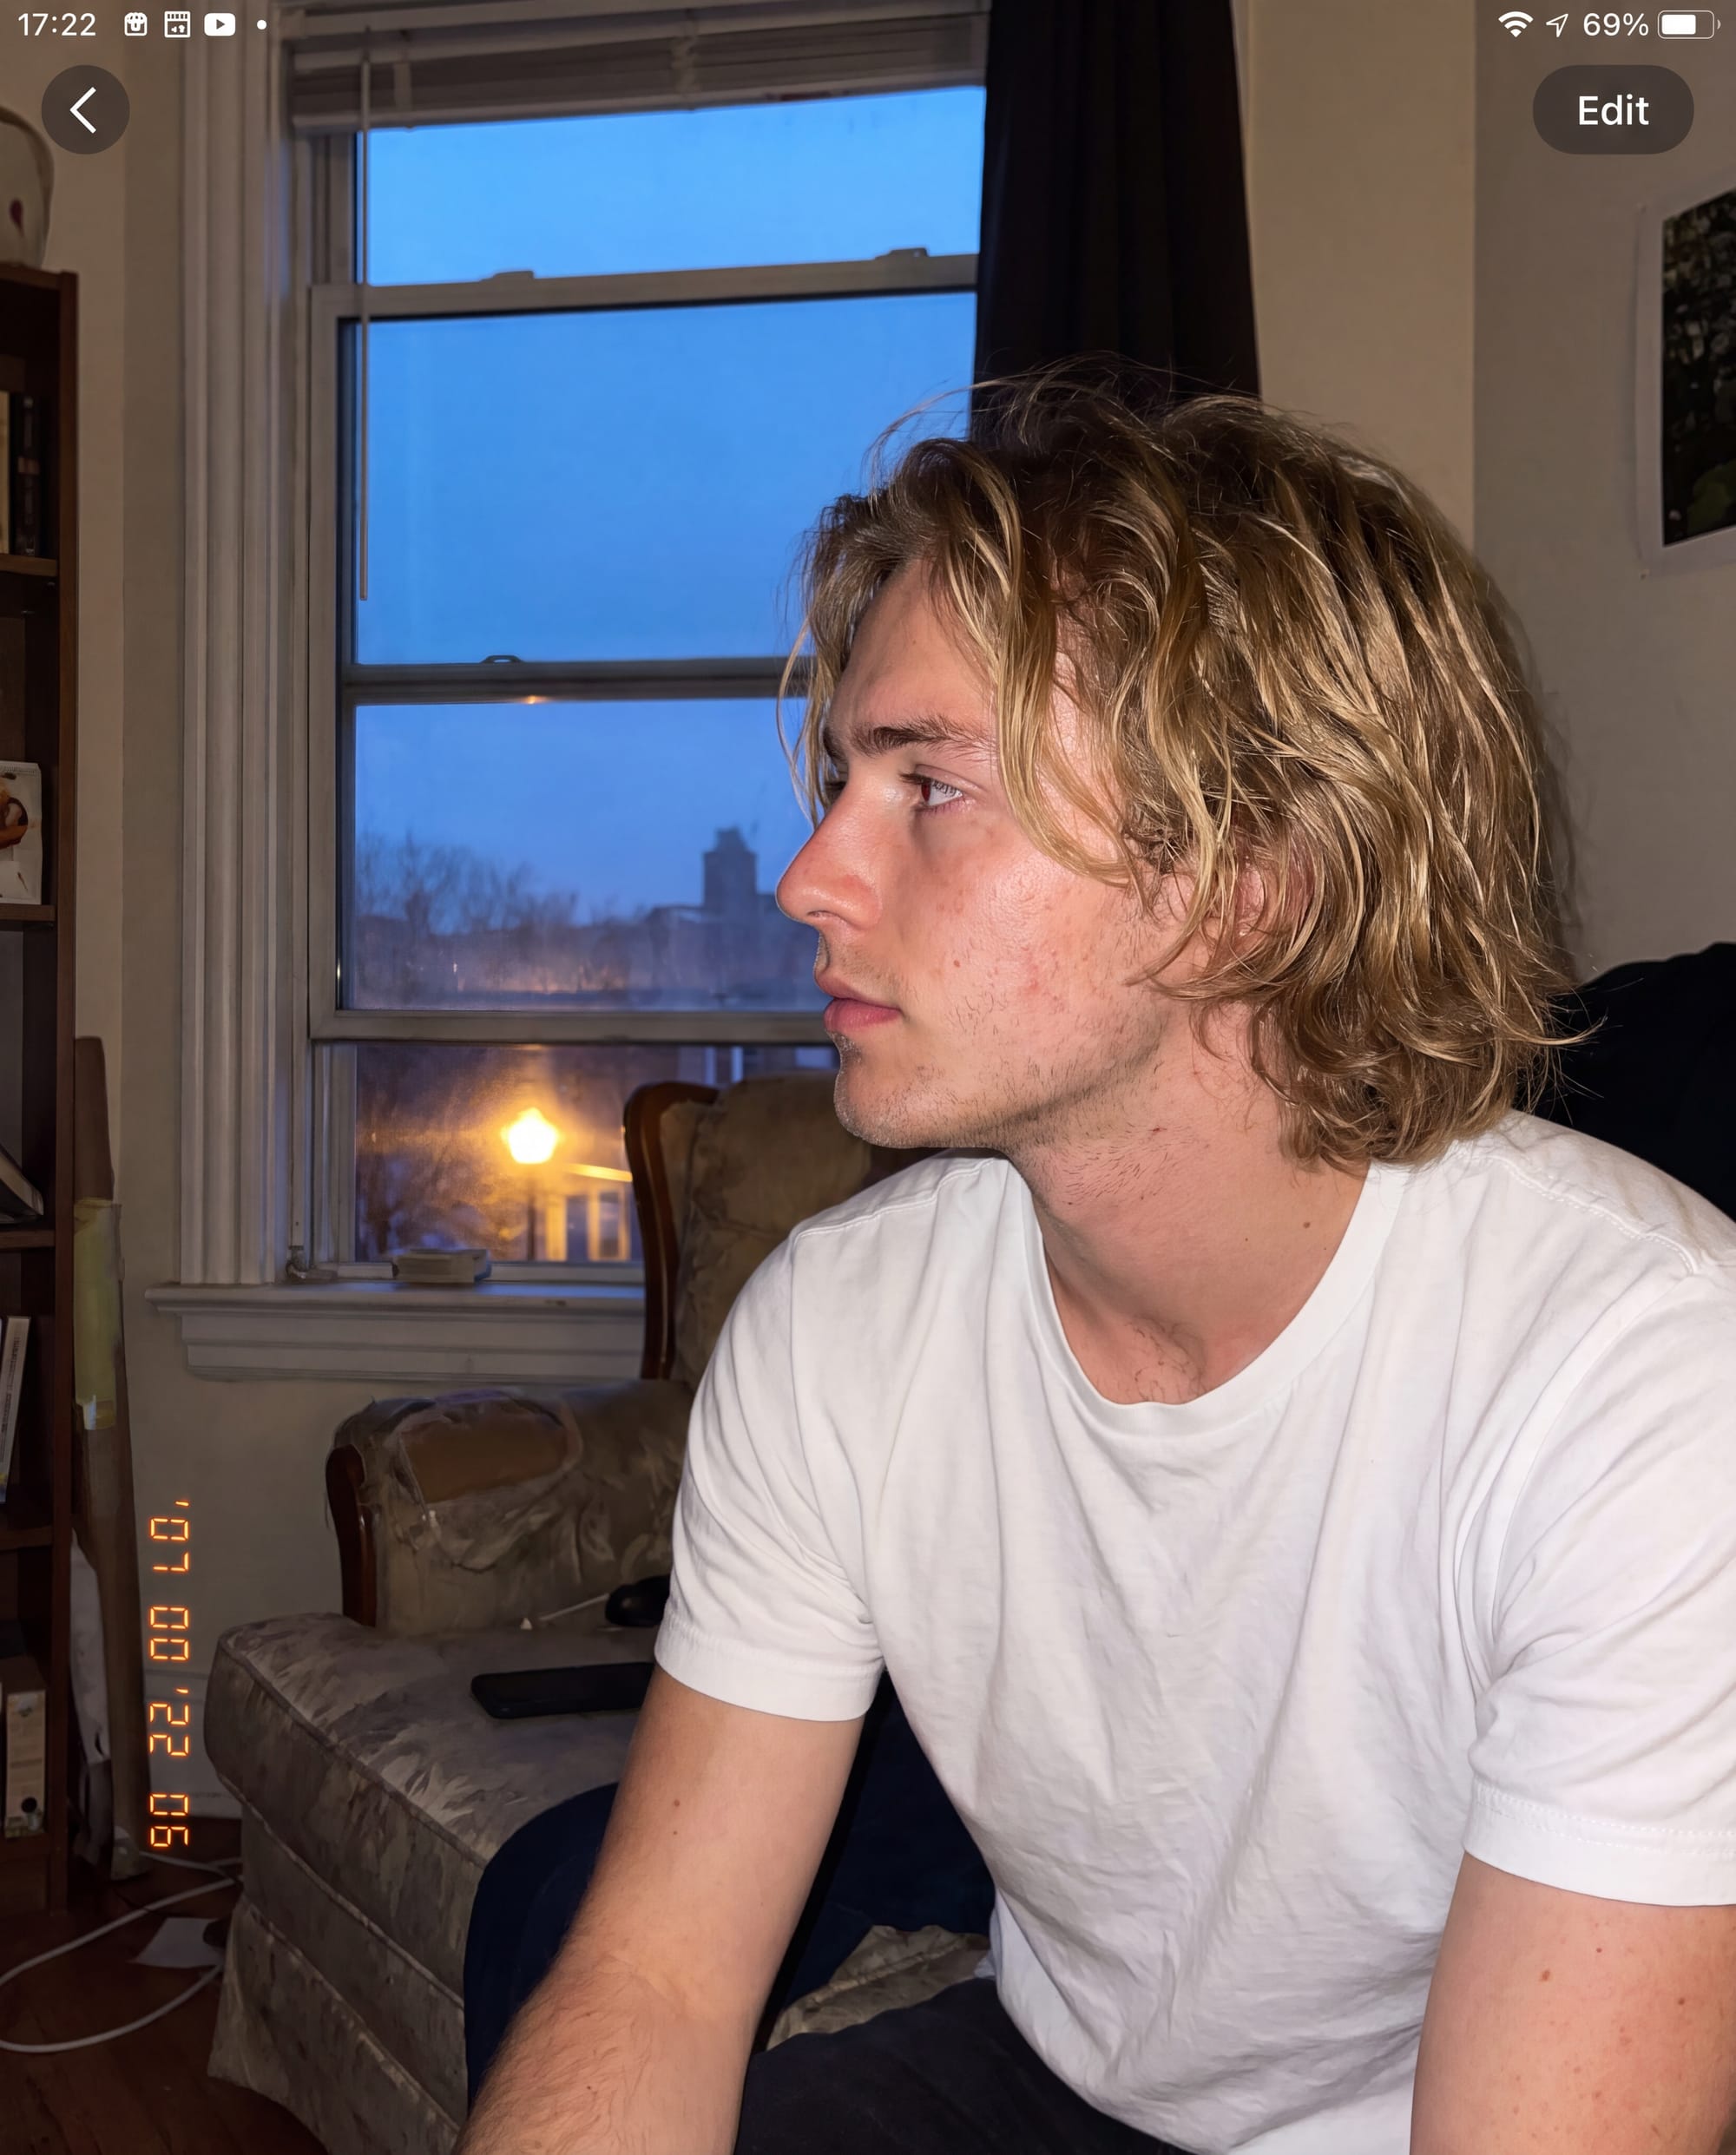
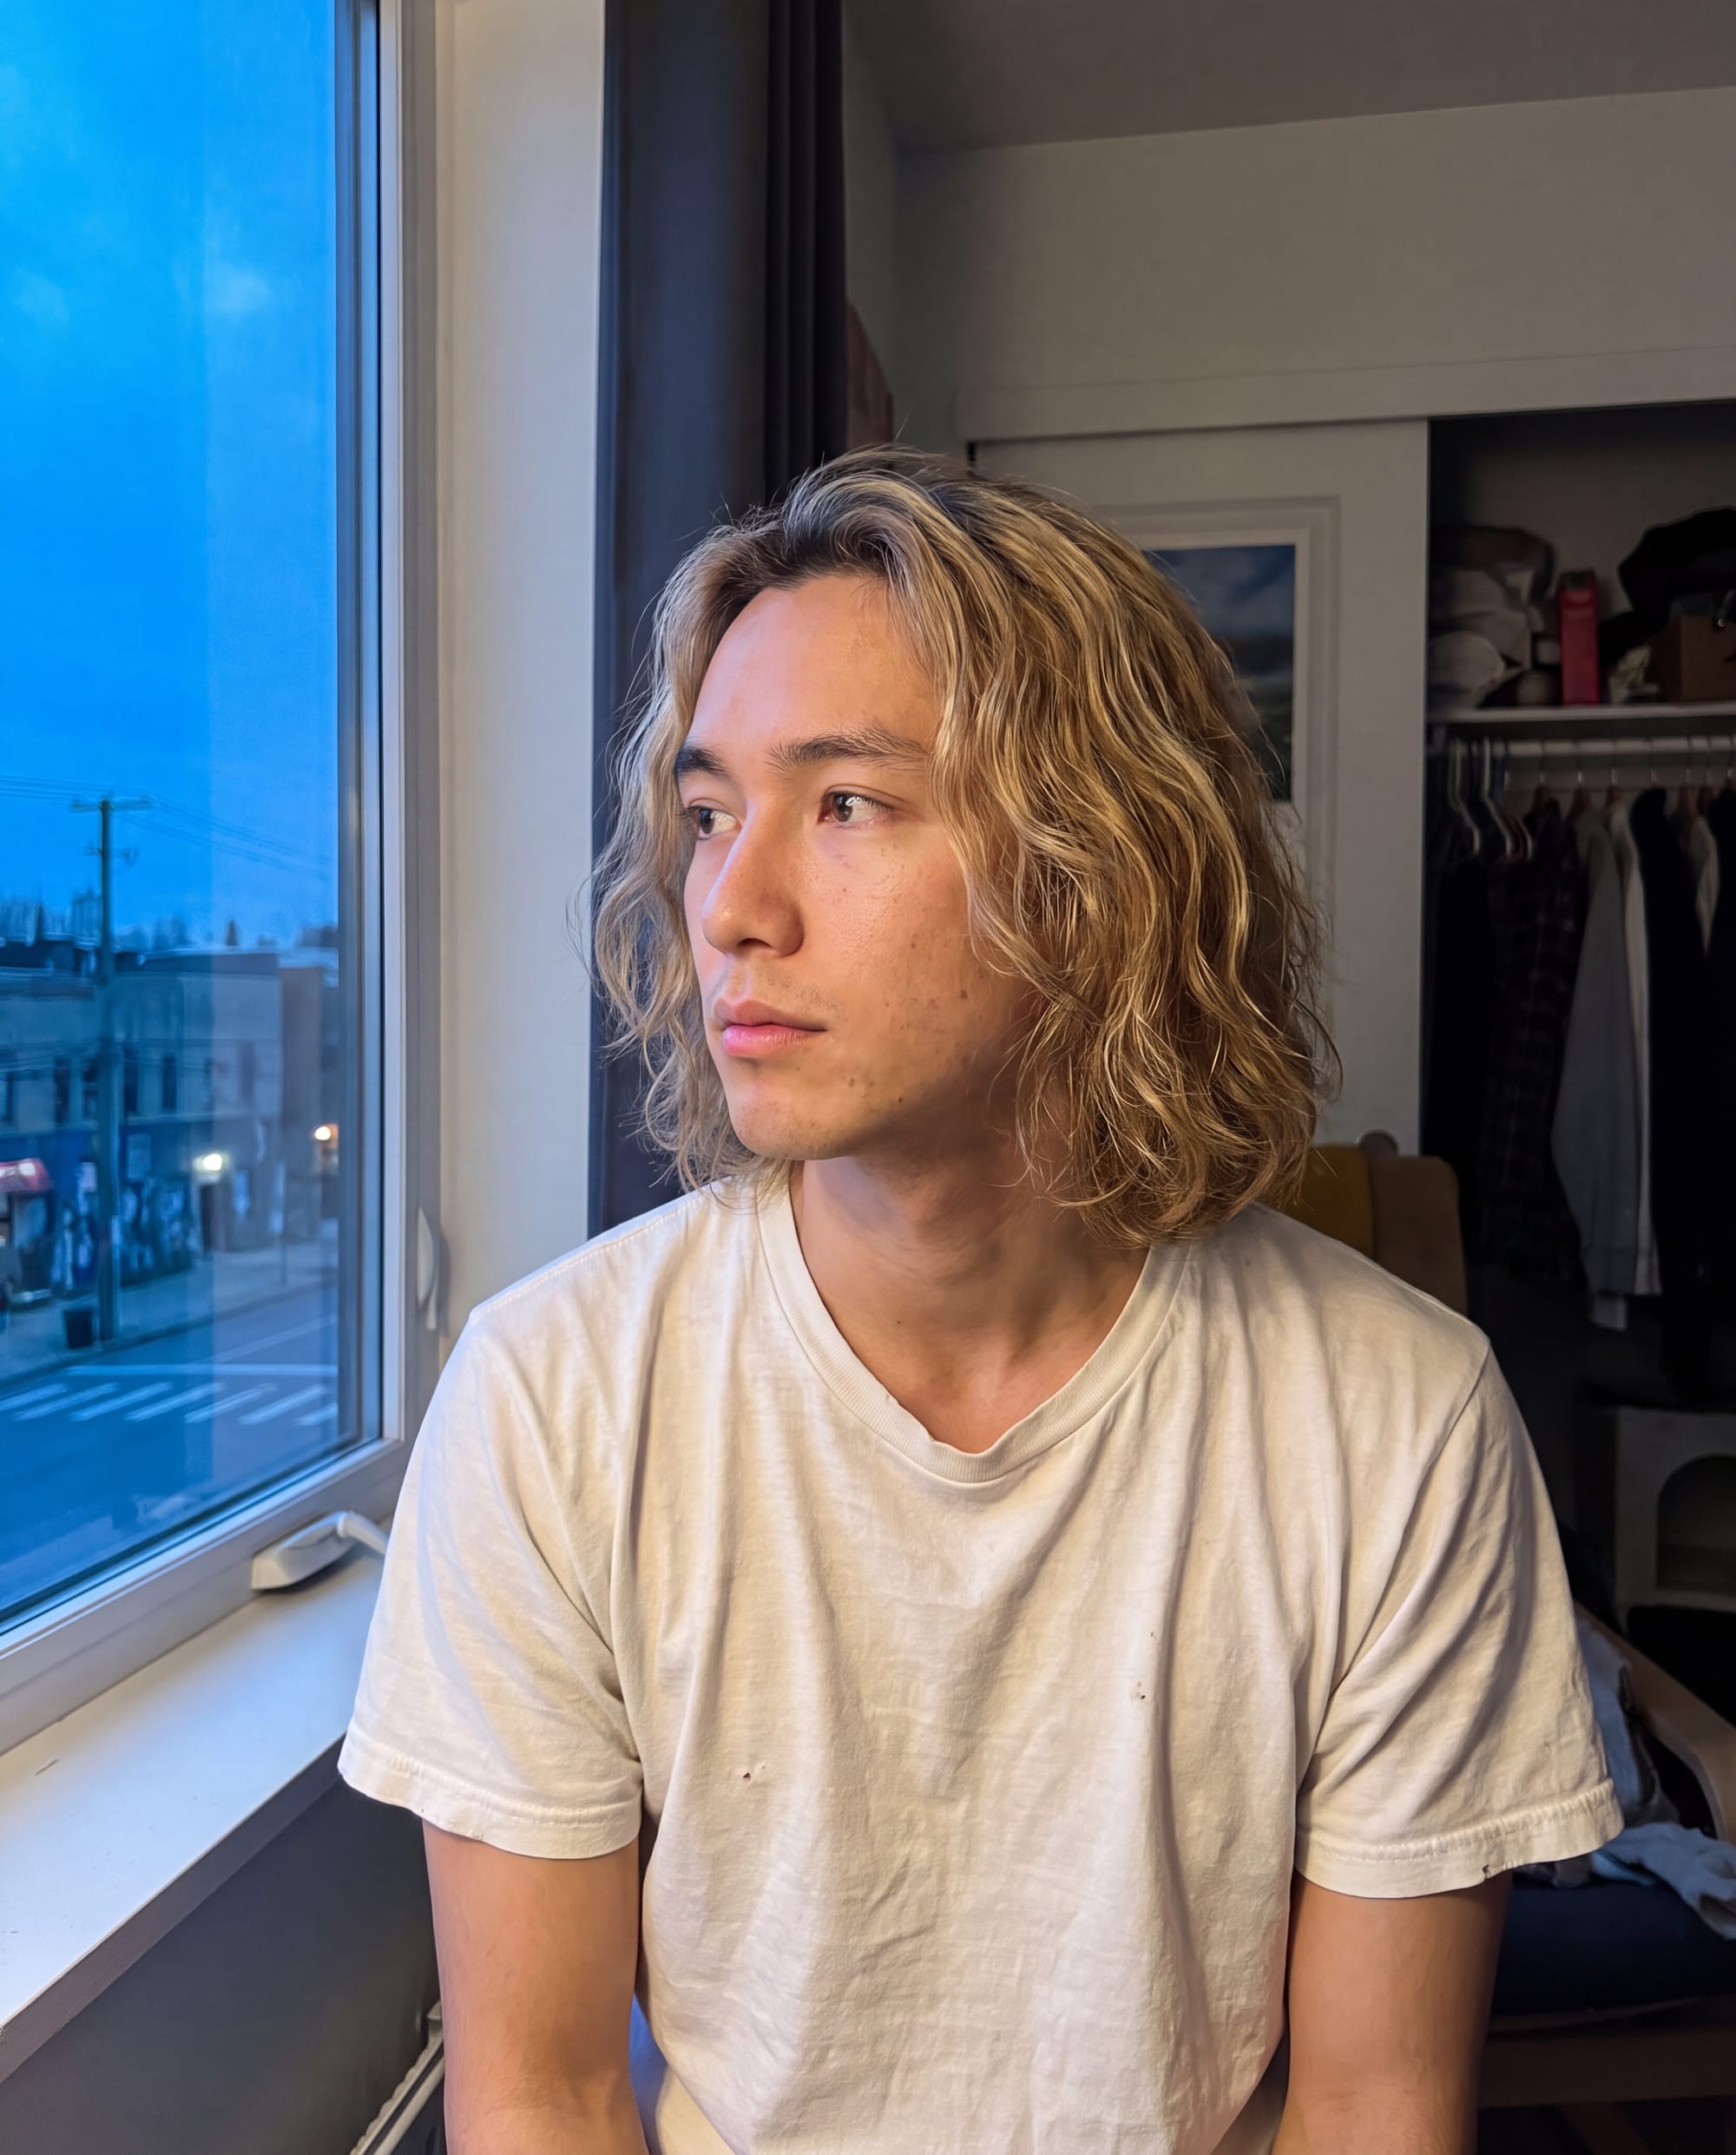
Three generations from the short prompt. The model changed the face and general interpretation between results. Result 2 also interpreted the smartphone direction as a Photos interface and added a timestamp.
The short prompt produced good image quality, but the set was chaotic.
The man did not look completely consistent between generations. The styling and atmosphere also moved around more than the prompt suggested. In one result, Nano Banana interpreted “smartphone photo” as an image displayed inside a phone interface and added a timestamp.
That is the trade-off with a short prompt. You save time, but you leave more decisions to the model.
The long prompt
OPERATION:
Create one new photorealistic image from scratch. The final result should look like a genuine casual smartphone photograph taken by another person inside a real apartment at blue hour. It must feel spontaneous and believable rather than staged, polished or obviously AI-generated.
SUBJECT:
A fictional 23-year-old man with a balanced Japanese-European appearance. He has distinctive but believable facial features, a refined jawline, softly defined cheekbones, almond-shaped eyes, straight natural brows and a calm, slightly distant presence. He should be attractive in an unusual high-fashion way without looking like a generic commercial model. Preserve a real apparent age of 23. Do not make him look older, younger, overly masculine, boyish or cosmetically perfected.
HAIR:
Shoulder-length blonde hair with a grown-out old-money shape, natural movement and a soft centre-to-off-centre part. The blonde should have believable tonal variation with cooler beige lengths, slightly darker roots and individual flyaway strands. Keep the length around the shoulders. Avoid a short haircut, slick styling, yellow blonde, grey blonde, excessive volume, wet hair or salon-perfect curls.
SKIN AND FACE DETAIL:
Natural light skin with visible pores, faint under-eye texture, subtle colour variation around the cheeks and nose and a small amount of realistic facial asymmetry. Keep the lips relaxed and naturally coloured. Do not add plastic smoothing, beauty-filter skin, glossy makeup, exaggerated freckles, heavy facial hair or an artificial symmetrical AI face. The eyes must have believable moisture, catchlights and eyelid structure without becoming unnaturally sharp.
BODY GEOMETRY:
Lean young male build with a natural neck, narrow waist and relaxed shoulders. Keep realistic head-to-neck scale and normal seated posture. Do not exaggerate the shoulders, chest, arms or jaw. Avoid fashion-illustration proportions, bodybuilder anatomy, a tiny head or an unnaturally long neck.
WARDROBE:
A plain, slightly relaxed white cotton crew-neck T-shirt with no logo, print, visible branding or decorative stitching. The cotton should show subtle folds, natural weight and mild wrinkling where the torso bends. Keep the wardrobe ordinary and believable. Do not add jewellery, a watch, sunglasses, layered clothing or luxury accessories.
SCENE:
A quiet lived-in apartment at blue hour, neither luxurious nor run-down. The room has restrained warm wood, a pale wall, a simple sofa and one or two indistinct everyday objects in the background. The space should feel personal but uncluttered. Keep the background secondary and softly readable. Do not turn it into a penthouse, hotel suite, photography studio, minimalist showroom or dramatic cinematic set.
POSE AND ACTION:
He is sitting naturally and quietly, with his torso angled slightly away from the camera. His shoulders are relaxed and uneven in the small way real seated shoulders are. His head is turned a little farther toward the window, and he looks outside rather than at the camera. His hands should remain outside the crop. The pose should feel caught between moments, not like a model holding a directed fashion pose.
EXPRESSION:
Neutral, alive and slightly thoughtful. Lips softly closed, jaw at rest, eyelids natural. No smile, frown, pout, seductive expression, intense stare or blank mannequin face. He should appear unaware of the exact moment the photograph was taken.
COMPOSITION:
Horizontal chest-up portrait with the subject placed slightly off-centre. Eye-level viewpoint from normal conversational distance. Include the full hair shape, neck, shoulders and upper chest without cutting through the top of the head. Leave some negative space in the direction of his gaze. Keep the perspective consistent with a handheld phone camera and avoid wide-angle facial distortion.
LIGHTING:
Blue-hour window light is the main source, falling softly across the side of his face closest to the window. A weak warm practical lamp deeper in the apartment creates mild colour contrast but should not look like designed cinematic lighting. Preserve soft, natural shadows beneath the jaw and around the eyes. Avoid studio key lights, rim lights, beauty-dish effects, dramatic orange-and-teal grading, crushed blacks or glowing skin.
CAMERA AND IMAGE CHARACTER:
The image should resemble a recent smartphone photograph with natural computational exposure, slight high-ISO softness and restrained edge sharpening. Keep the face properly focused while allowing the background to fall away gently through distance rather than extreme artificial blur. Do not imitate medium-format photography, an 85 mm fashion portrait, analog film stock or a professional campaign. Avoid perfect micro-detail, aggressive HDR, fake grain, heavy bokeh circles, lens flare or a cinematic letterbox.
COLOUR AND FINISH:
Muted blue-hour blues, warm neutral skin and restrained apartment tones. Natural white balance with no heavy preset. Keep contrast moderate and saturation realistic. The white T-shirt should remain neutral white while still reflecting the cool room light. Preserve fine tonal transitions in the face and hair without overprocessing.
REALISM:
Maintain anatomically correct facial structure, believable ears, natural hair overlap, realistic fabric folds and consistent light direction. The image should contain small imperfections associated with an ordinary handheld photograph. It must not look like a 3D render, beauty campaign, stock photograph, painted portrait or synthetic AI influencer image.
NEGATIVE CONSTRAINTS:
No text, logos, watermarks, jewellery, tattoos, extra people, mirrors, duplicate features, malformed ears, crossed eyes, waxy skin, overly white teeth, visible hands, floating objects, warped furniture, impossible reflections, excessive background blur, studio equipment, professional fashion styling or obvious generative artefacts.
OUTPUT:
One photorealistic horizontal image. Keep all important facial features and the full hair shape inside the central safe area. The final result must remain a quiet, candid blue-hour smartphone portrait of the described man in the described apartment.
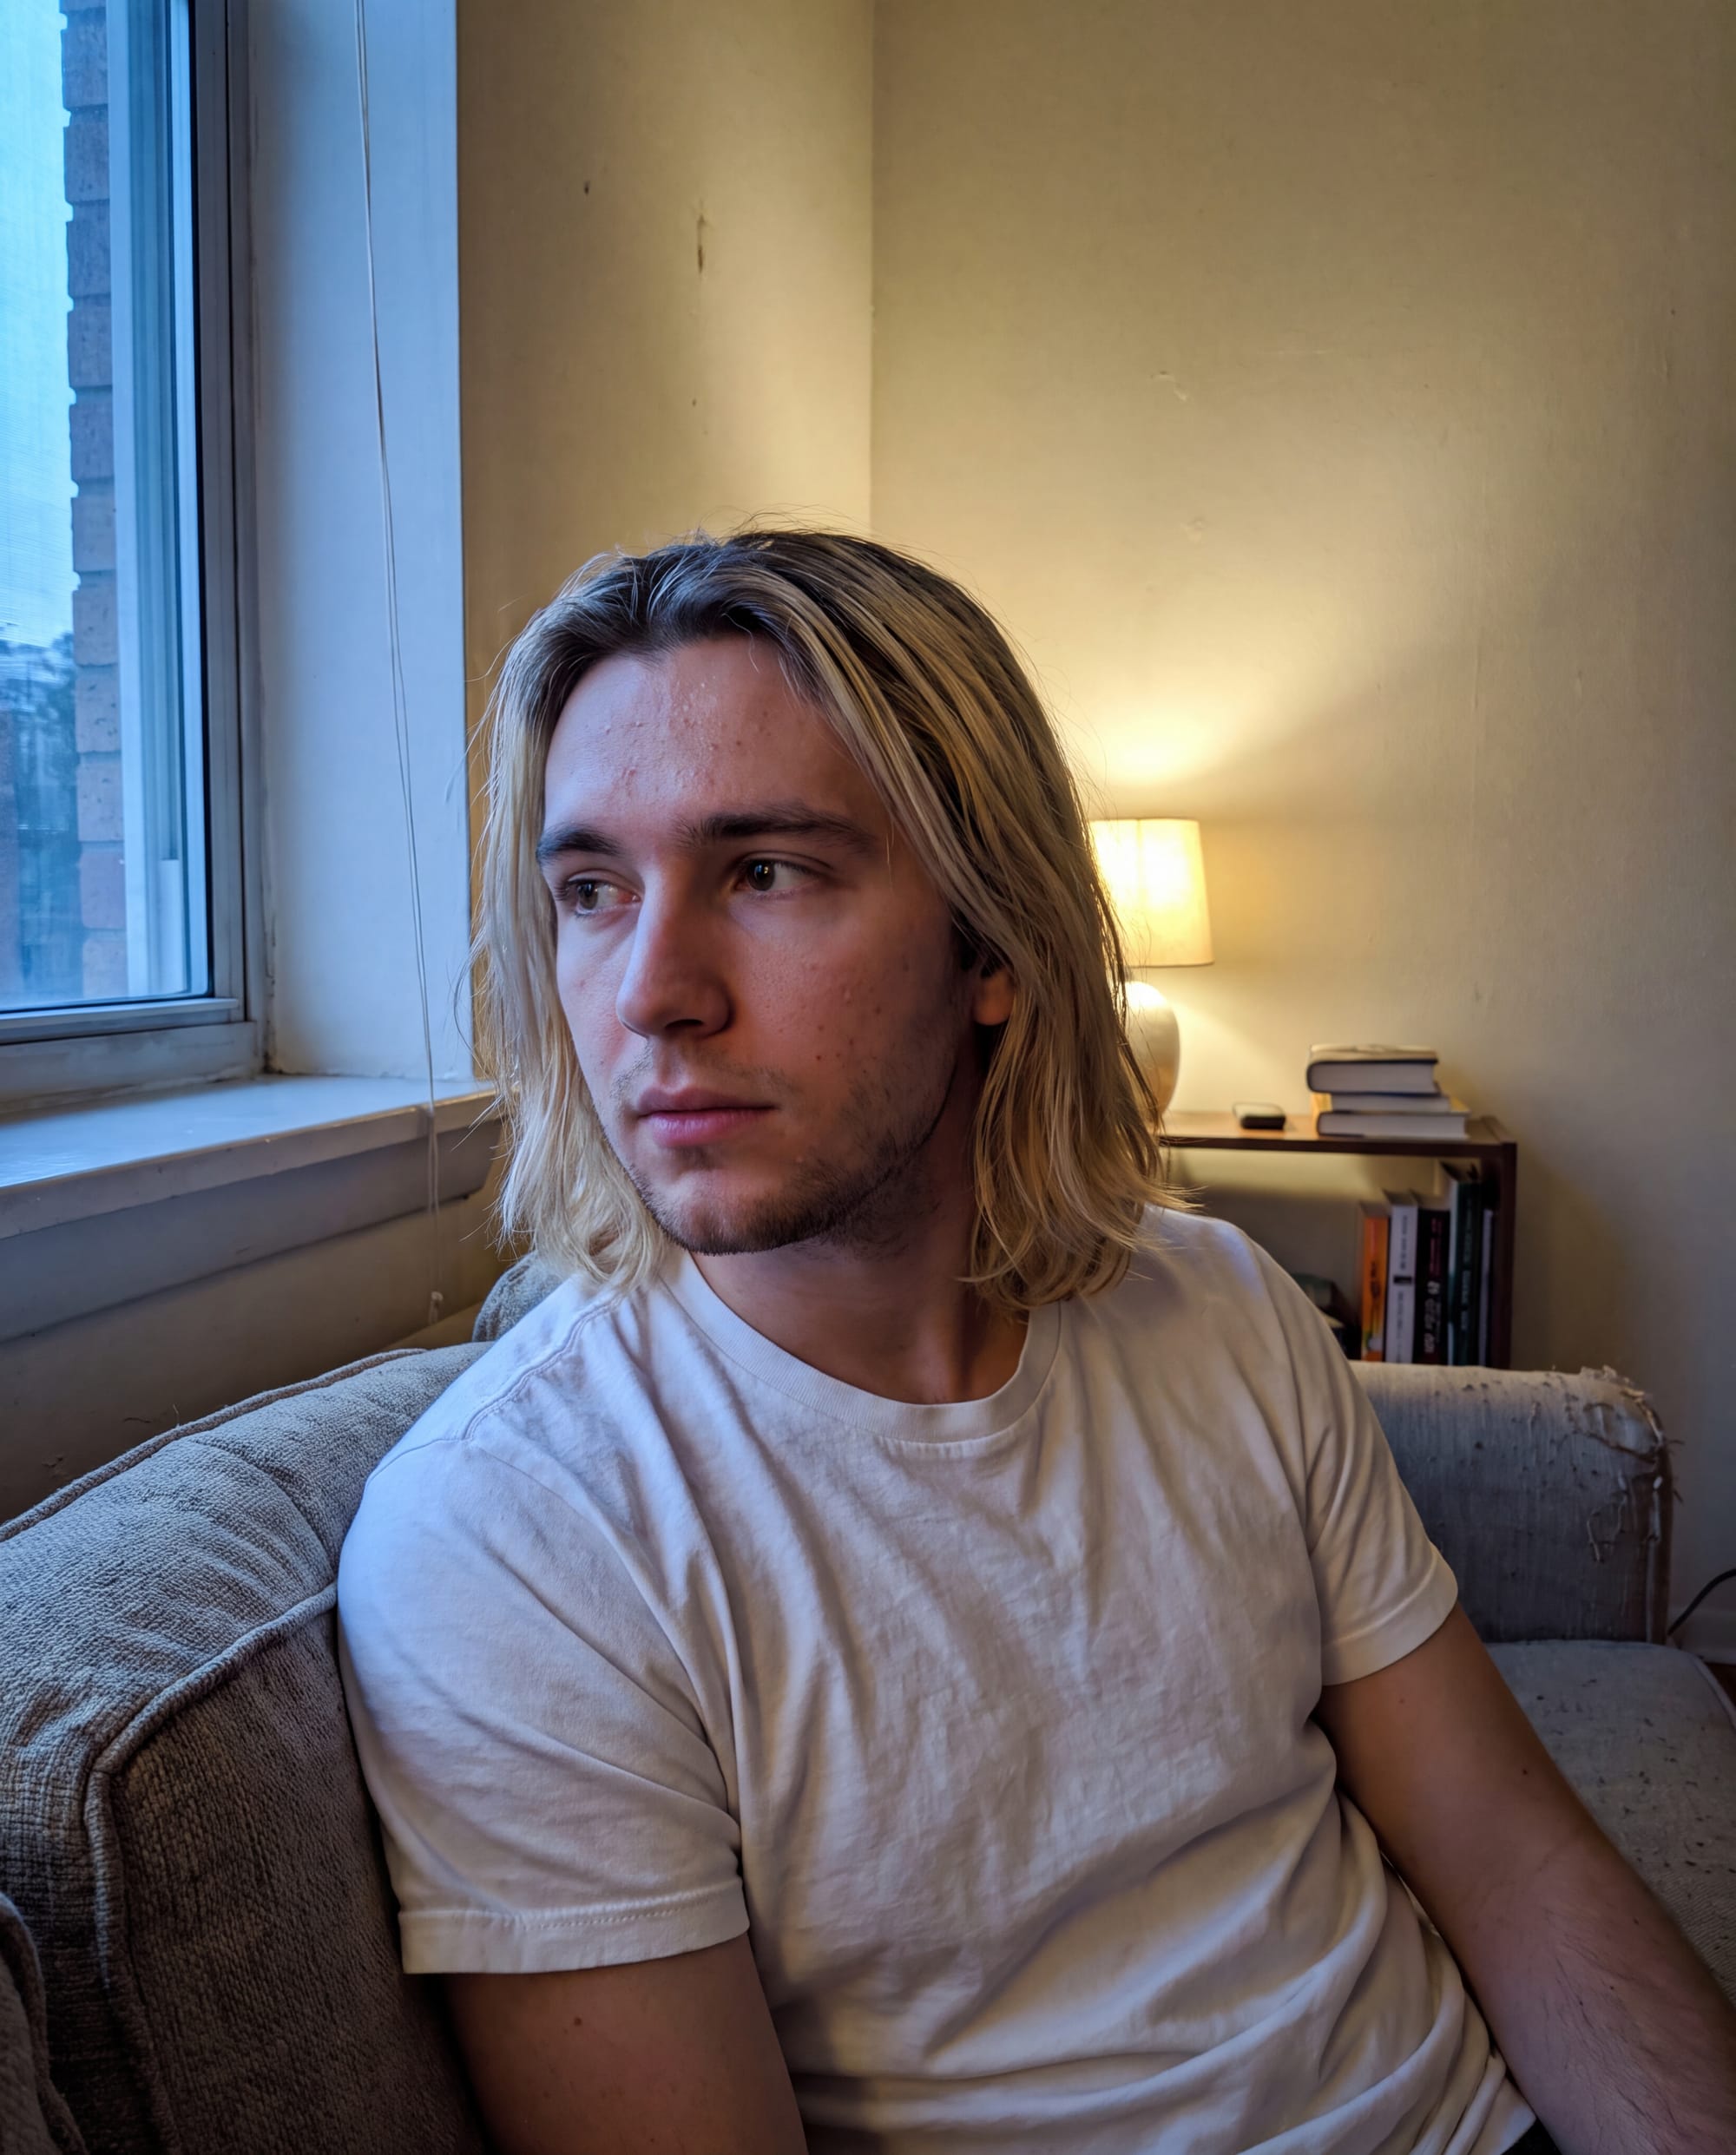
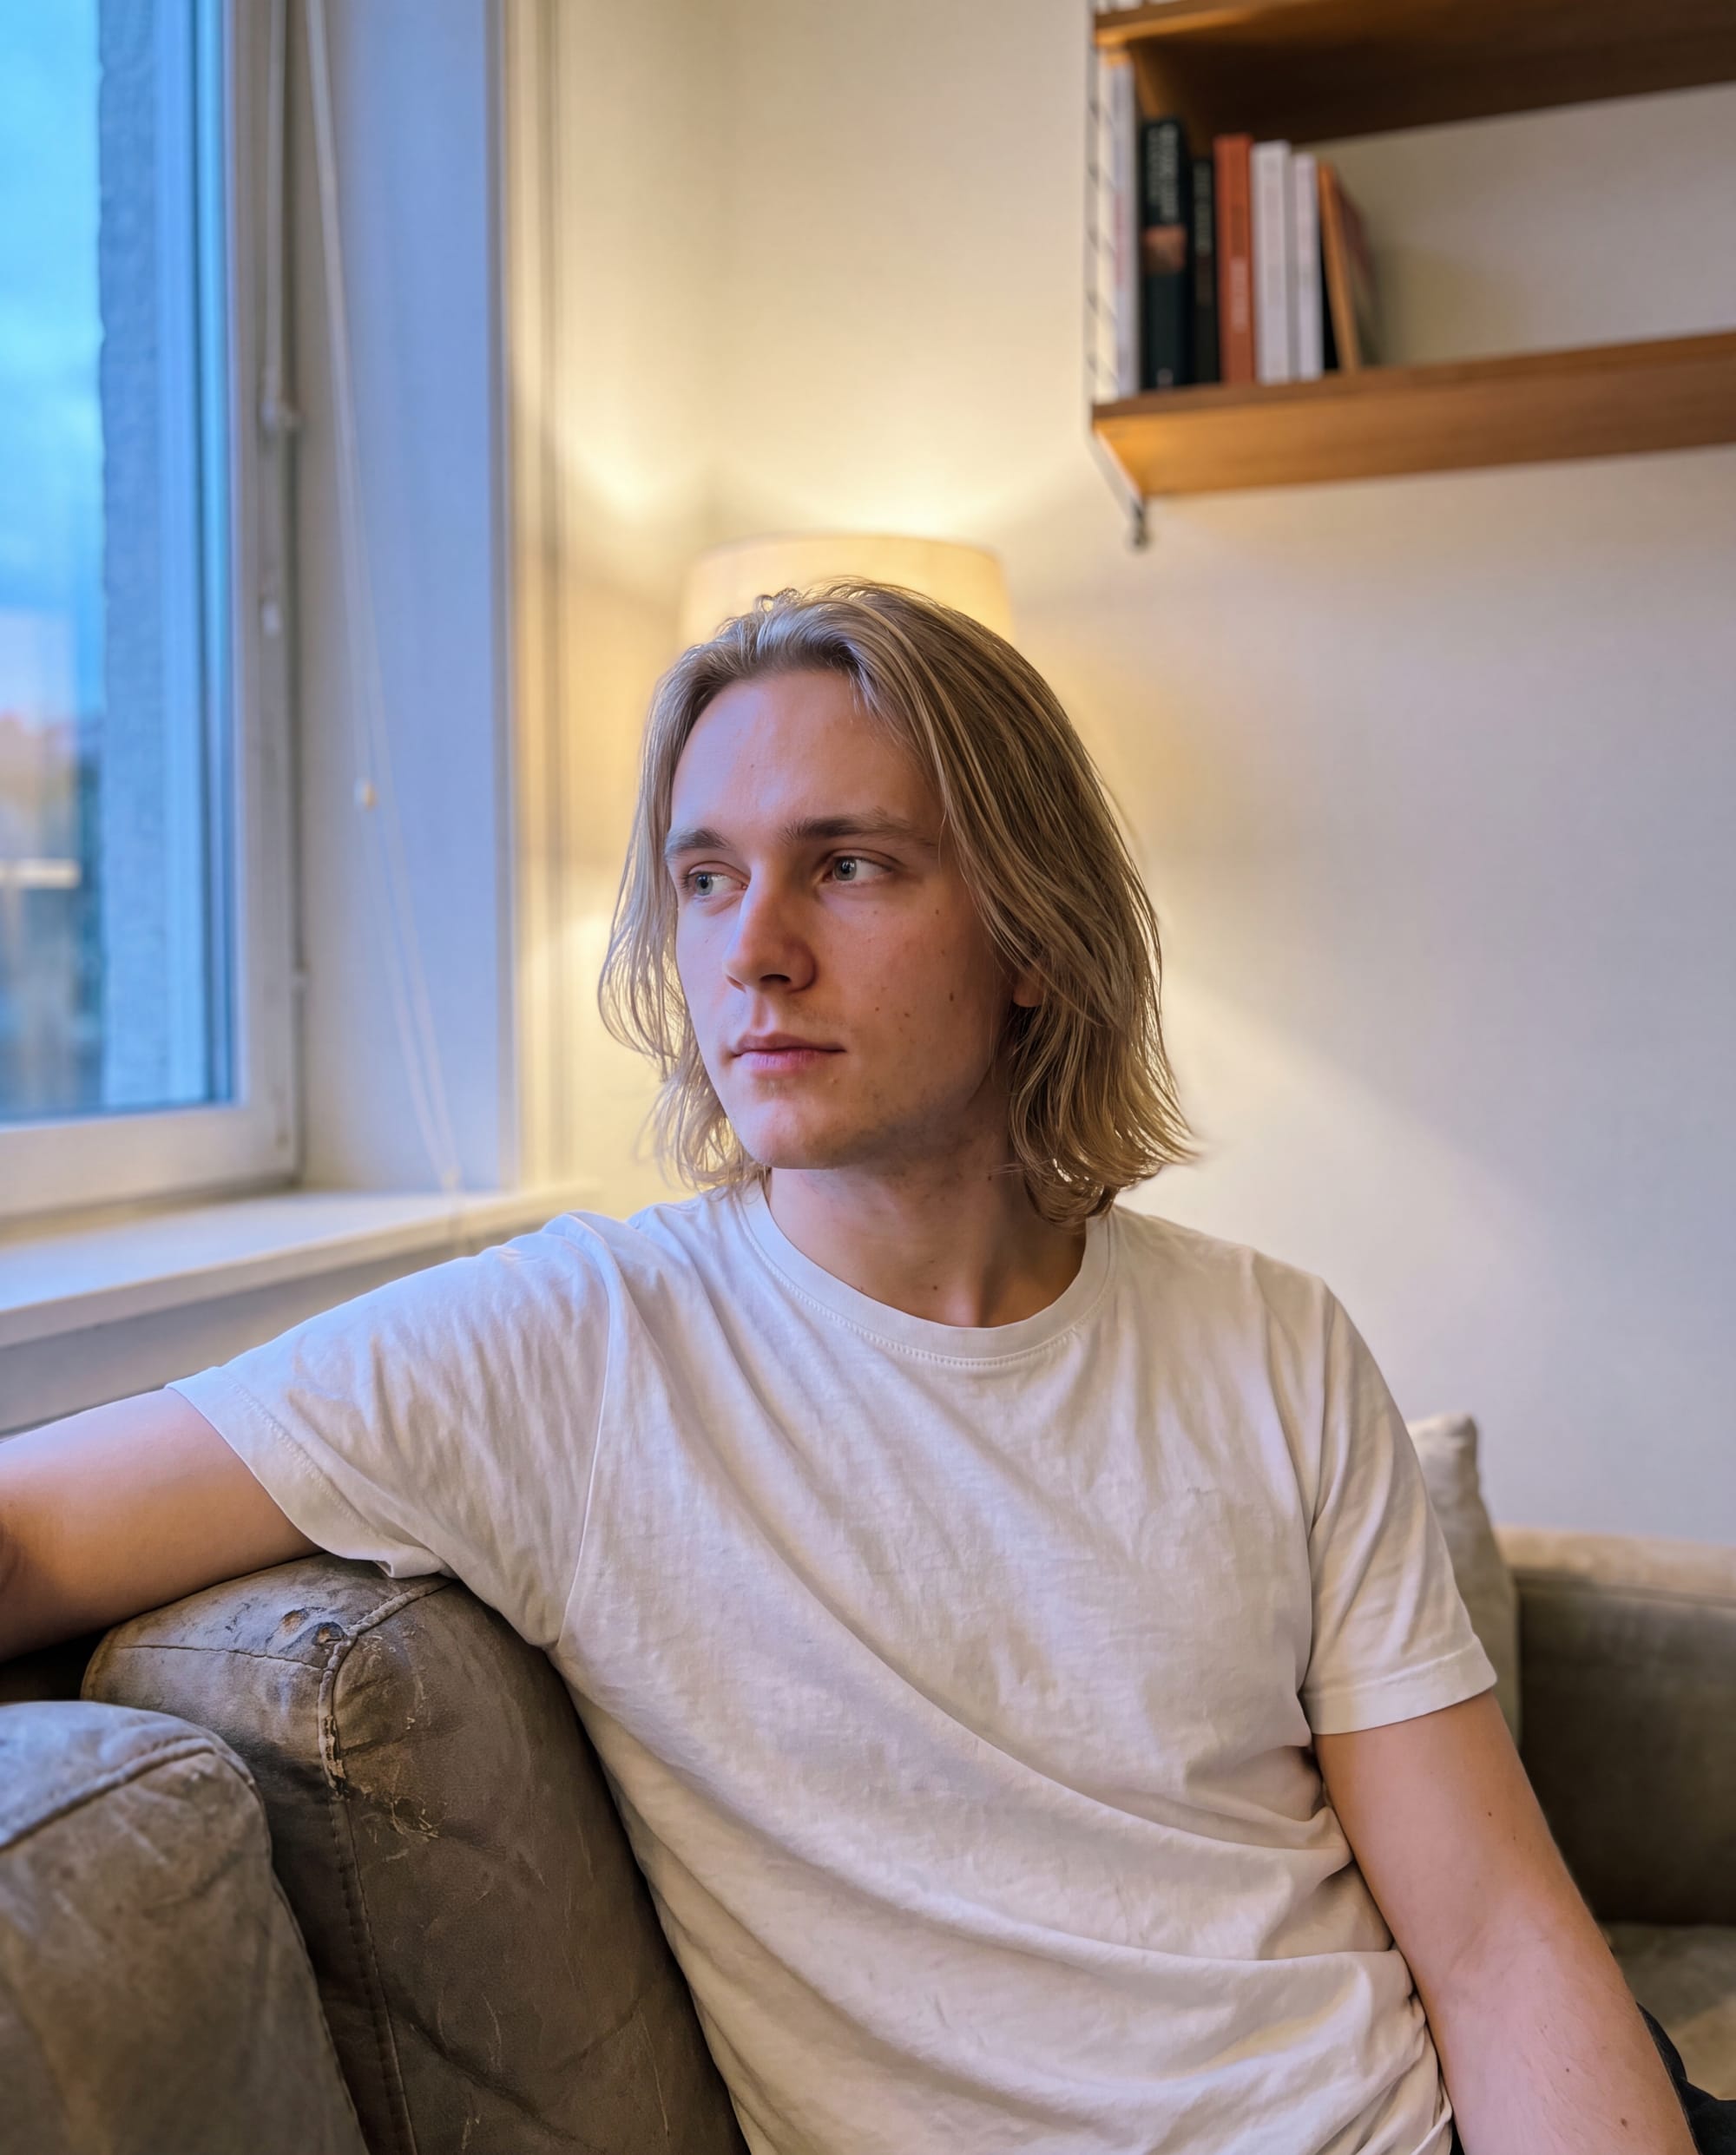
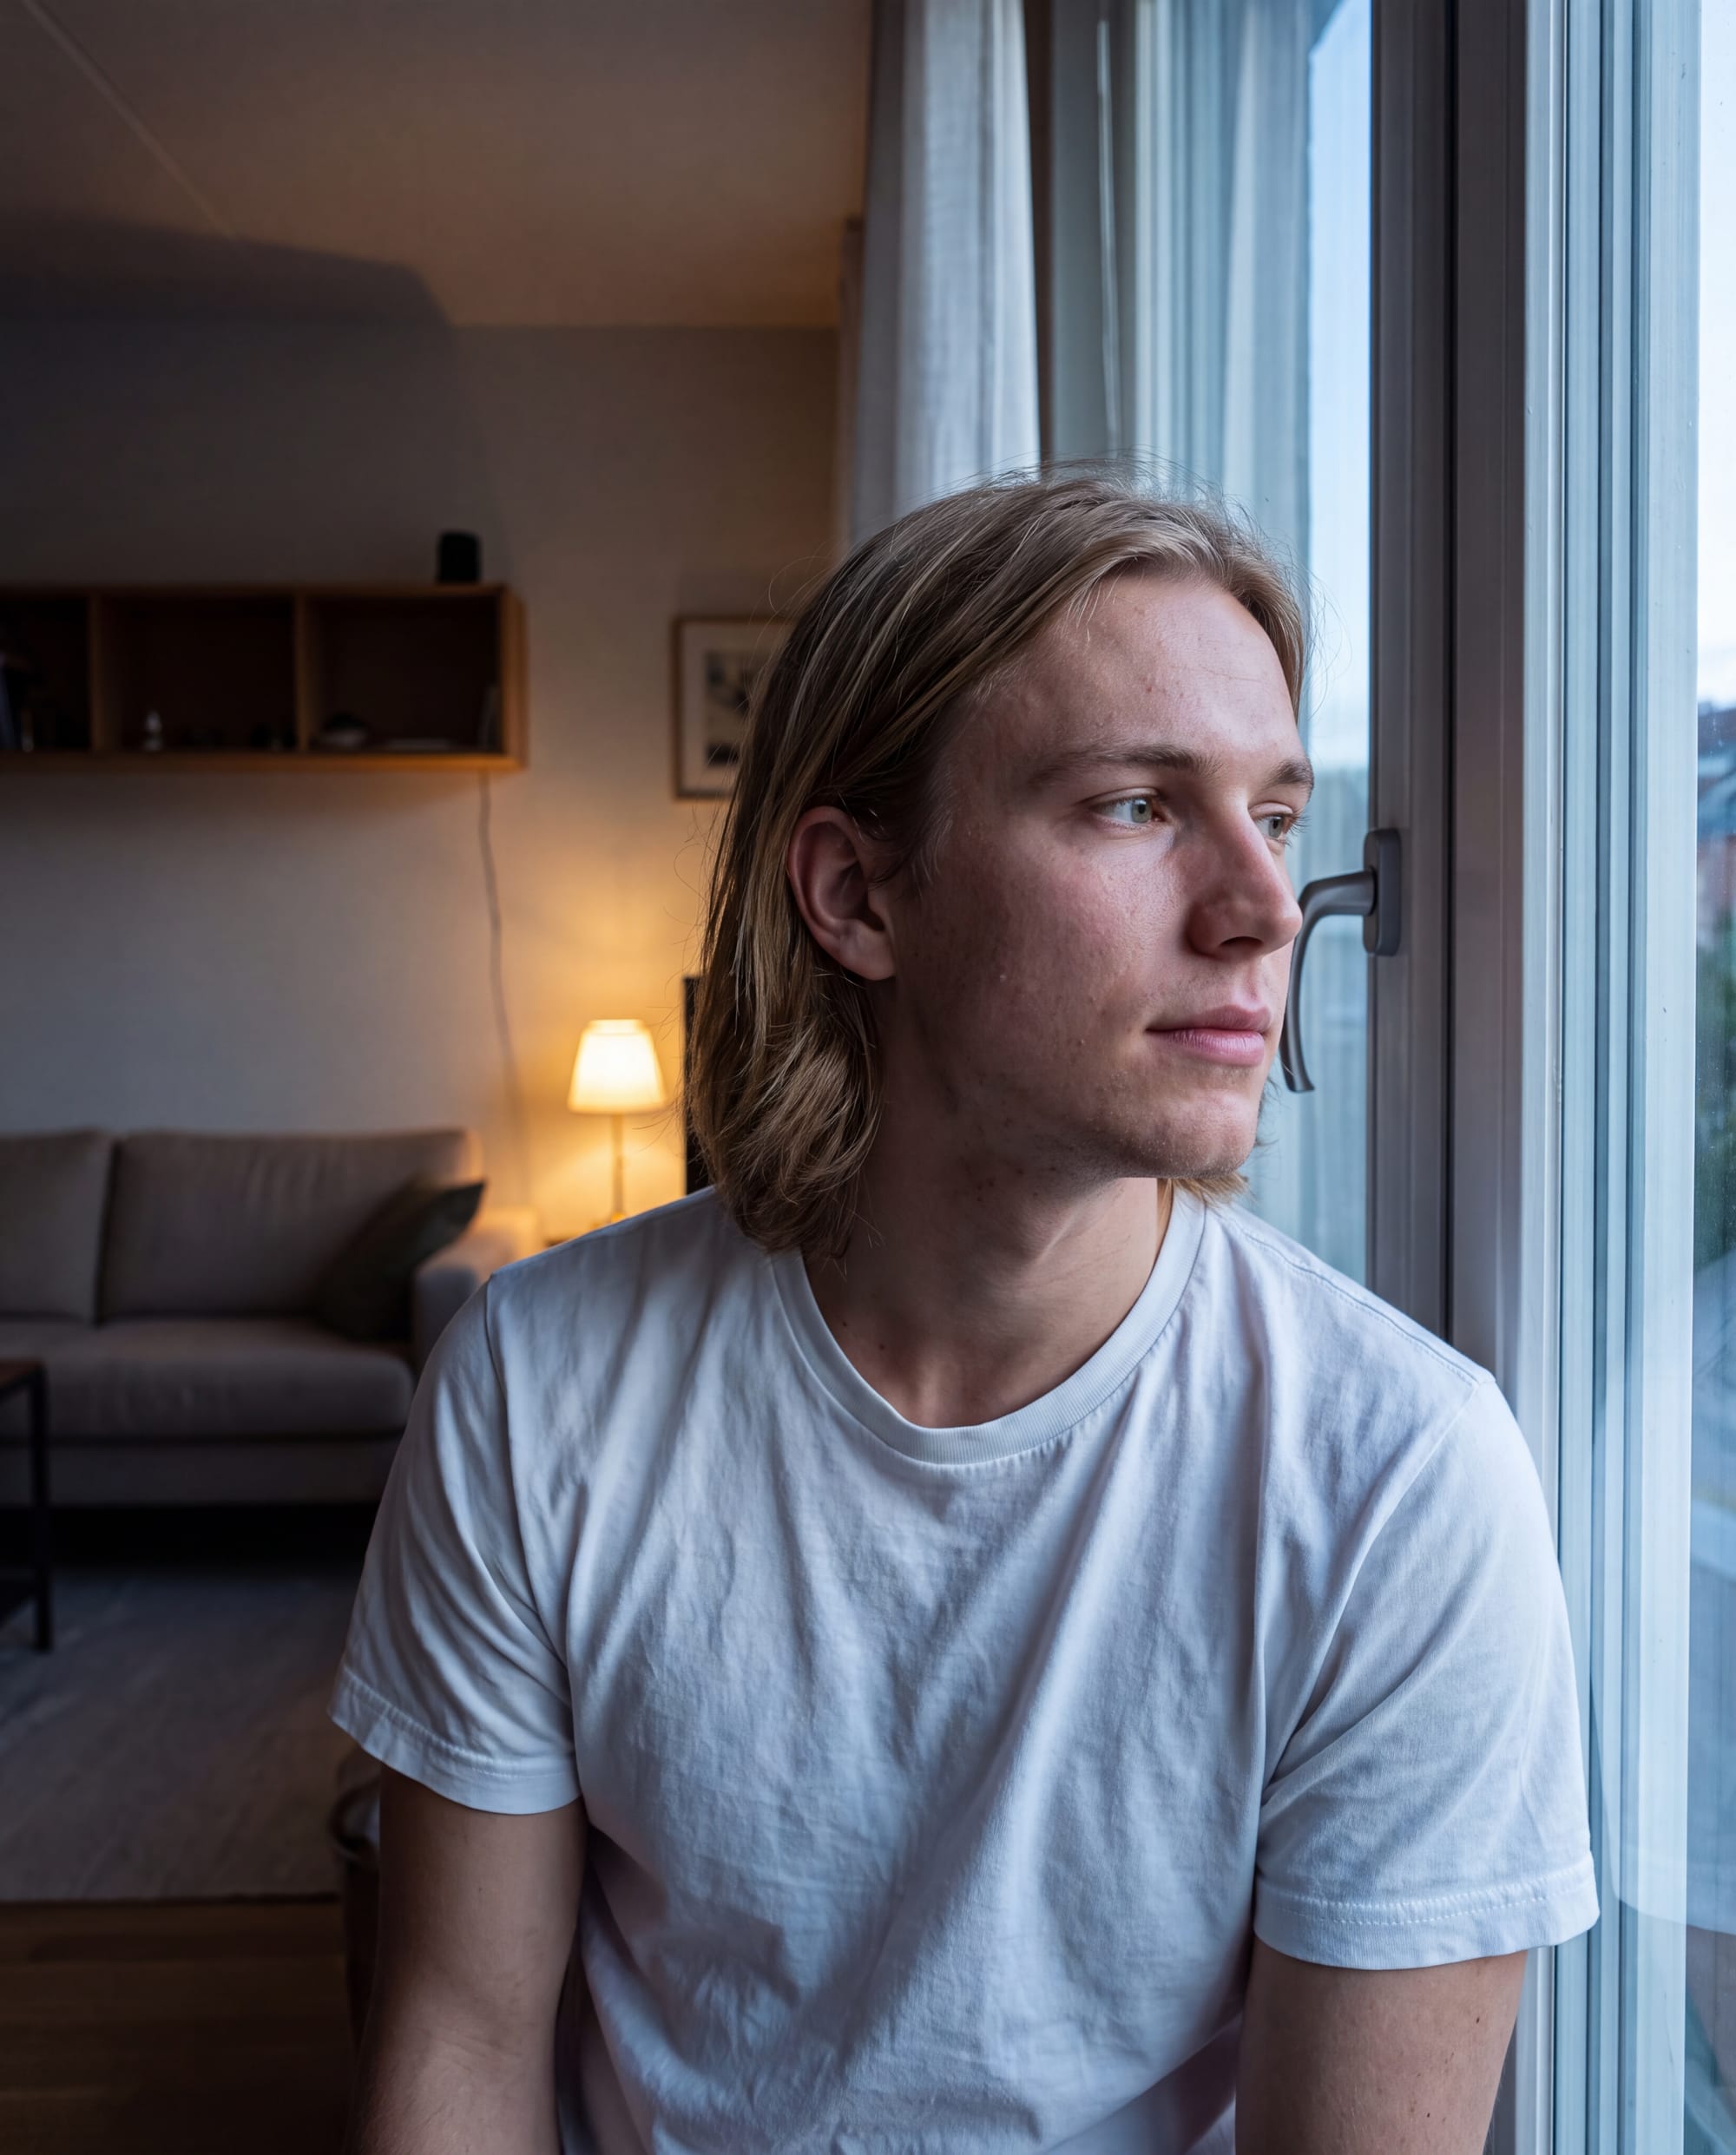
Three generations from the 6,000-character prompt. The requested scene stayed more controlled, but the faces, proportions and skin treatment still changed between results.
The long prompt controlled the apartment, wardrobe, lighting and camera direction more closely. It also avoided the strange Photos-interface result.
It did not remove the chaos completely.
One result pushed the head proportions too far. Another had overly bright skin highlights and a smoother finish than requested. The facial interpretation still changed between generations.
The “Japanese-European” description probably contributed to the variation. That phrase covers a huge range of possible faces, and Nano Banana had to invent its own combination each time.
Before we declare the model racist, relax. I’m kidding.
There may be wider representation problems inside image-model training data, but six portraits are nowhere near enough to prove that. What this test shows is that a mixed-heritage description without a face reference leaves plenty of room for interpretation.
What did the test show?
| Comparison | Short prompt | Long prompt |
|---|---|---|
| Image quality | Good | Good |
| Scene control | More variation | More controlled |
| Character consistency | Low | Slightly better, but still inconsistent |
| Main problems | Different faces, loose styling, phone interface and timestamp | Different faces, enlarged head proportions, bright skin and smoothing |
| Writing required | A few sentences | More than 6,000 characters |
Neither prompt produced perfect consistency.
The long prompt gave Nano Banana tighter control over the scene, but it did not produce a clear improvement in image quality. The short prompt reached the same general quality range with much less writing.
For this image, the 6,000-character version was unnecessary. A more complicated composition with several people, products and reference roles could justify it.
The conclusion is simple: extra detail can improve control without improving the image.
For more comparisons between image models, read our test of seven AI image generators across 36 editing tasks.
6. How Should You Use Reference Images?
Give every reference image one clear role.
For a product:
Use Image 1 for the product’s exact shape, colour and branding. Use Image 2 only for the camera angle and composition. Place the product from Image 1 into a warm studio scene using the layout from Image 2.
For a person:
Use Image 1 as the facial identity reference. Use Image 2 as the body reference. Use Image 3 only for the pose, wardrobe, lighting and composition. Create the person from Images 1 and 2 inside the scene shown in Image 3.
This is why our medium-length character prompts worked well in previous tests. They were longer, but the blocks had clear jobs. One image controlled the face, another controlled the body and the third controlled the composition.
If a face reference already shows the eyes, nose, lips and facial proportions, you usually do not need separate paragraphs describing them. Those written descriptions can compete with the reference and pull the face away from it.
The Gemini image documentation supports multiple reference inputs, but the limits differ between models and interfaces. Clear roles still matter even when the model accepts several images.
More references do not guarantee a better result. If two references contain different faces, body proportions, outfits or poses and you do not explain their roles, Nano Banana may combine them.
For the full workflow, read our guide to creating a consistent AI character without LoRA training.
Pro tip: If the reference already provides the information, tell Nano Banana what to preserve and what to change. Do not rewrite the entire reference in text.
7. Why Should You Change One Thing Per Edit?
Changing one thing per edit is useful advice, but it is not a strict rule.
Related changes can go together. If you replace afternoon light with sunset, the sky, shadows and colour temperature should change together. That is one coherent edit.
The larger problem is repeatedly editing the edited image.
Each generation can reconstruct parts of the face, hair, fabric and background. After several rounds, the image may start looking oversmoothed, sharpened, artificial or generally overprocessed. Small identity changes can also build up between edits.
If the face, pose and composition are already correct, use a focused request:
Replace the white T-shirt with a dark green knitted polo. Keep the face, hair, pose, framing, lighting and background unchanged.
You can ask for several changes at once, but understand what that means. New hair, a different outfit, another pose, a wider camera angle, a new background and sunset lighting are close to a full regeneration.
If an edit damages a good result, return to the original or the last clean image. Do not keep repairing the damaged version until the person looks like a wax figure.
Pro tip: Save your best clean result before continuing. Treat it as a checkpoint you can return to.
8. Learn What Your Image Model Can Handle
When we say “learn your model,” we do not mean memorising its supported aspect ratios, maximum resolution or how many reference images the interface accepts. Those are technical specifications. They may matter when setting up a generation, but they do not tell you how to write a better prompt.
You need to learn what the model actually responds to.
Does it understand direct photography language? Does it recognise specific lighting setups, hairstyles, fashion terms and camera characteristics? Does it follow natural sentences better than compact visual keywords? Where should the operation and reference roles appear? How much detail can you add before it starts blending separate instructions into one confused result?
Camera names are a good example. Writing “Hasselblad” or “Sony” can influence the result if the model has a strong learned visual association with that camera or photographic style. Inventing something like “Hasselblad 3000 Super Nano” adds nothing. If the model does not recognise the equipment, aesthetic or technical term, it will either ignore it or make a vague guess.
Even real camera names are not magic quality buttons. If “Hasselblad X2D” only makes the model produce a generic polished portrait, you are better off describing the visible qualities you actually want: controlled highlights, natural skin transitions, medium-format depth and restrained sharpening.
The same applies to less technical language. “Old-money haircut,” “blue-hour apartment snapshot,” “commercial swimwear campaign” and “casual smartphone photo” may create useful associations in one model and generic nonsense in another.
Prompt structure also changes between models. One may respond well when you begin with the operation and give every reference image a clear role. Another may care more about the subject and composition appearing first. Some models handle long natural-language instructions well. Others start losing details once the prompt becomes too crowded.
There is no universal order that works perfectly everywhere.
Test the model with small controlled changes. Use the same subject and scene, then change one phrase, move one instruction or replace a camera name with a description of its visible effect. See what actually changes in the output.
That is what learning your model means: understanding its visual vocabulary, its preferred prompt language, which instructions it follows reliably and which impressive-sounding words do absolutely nothing.
Our AI image generator and editor benchmark showed exactly this. A model can produce excellent people and still fail an ordinary edit because each model responds differently to the same instructions.
Nano Banana, Seedream, FLUX and Qwen can all produce strong images. They still interpret the same prompt differently. Copying one enormous “perfect prompt” across all of them without changing the language makes no sense.
9. Where Can You Find Good Nano Banana Prompts?
Start with Google’s official Nano Banana prompting guide and Gemini image-generation documentation.
They cover:
- Text-to-image prompting
- Reference images
- Image editing
- Text rendering
- Aspect ratios
- Current Nano Banana models
- Supported inputs
The Awesome Nano Banana Pro Prompts repository is also useful. Its creators say it contains more than 10,000 prompts with preview images. The same project runs the more visual YouMind prompt gallery.
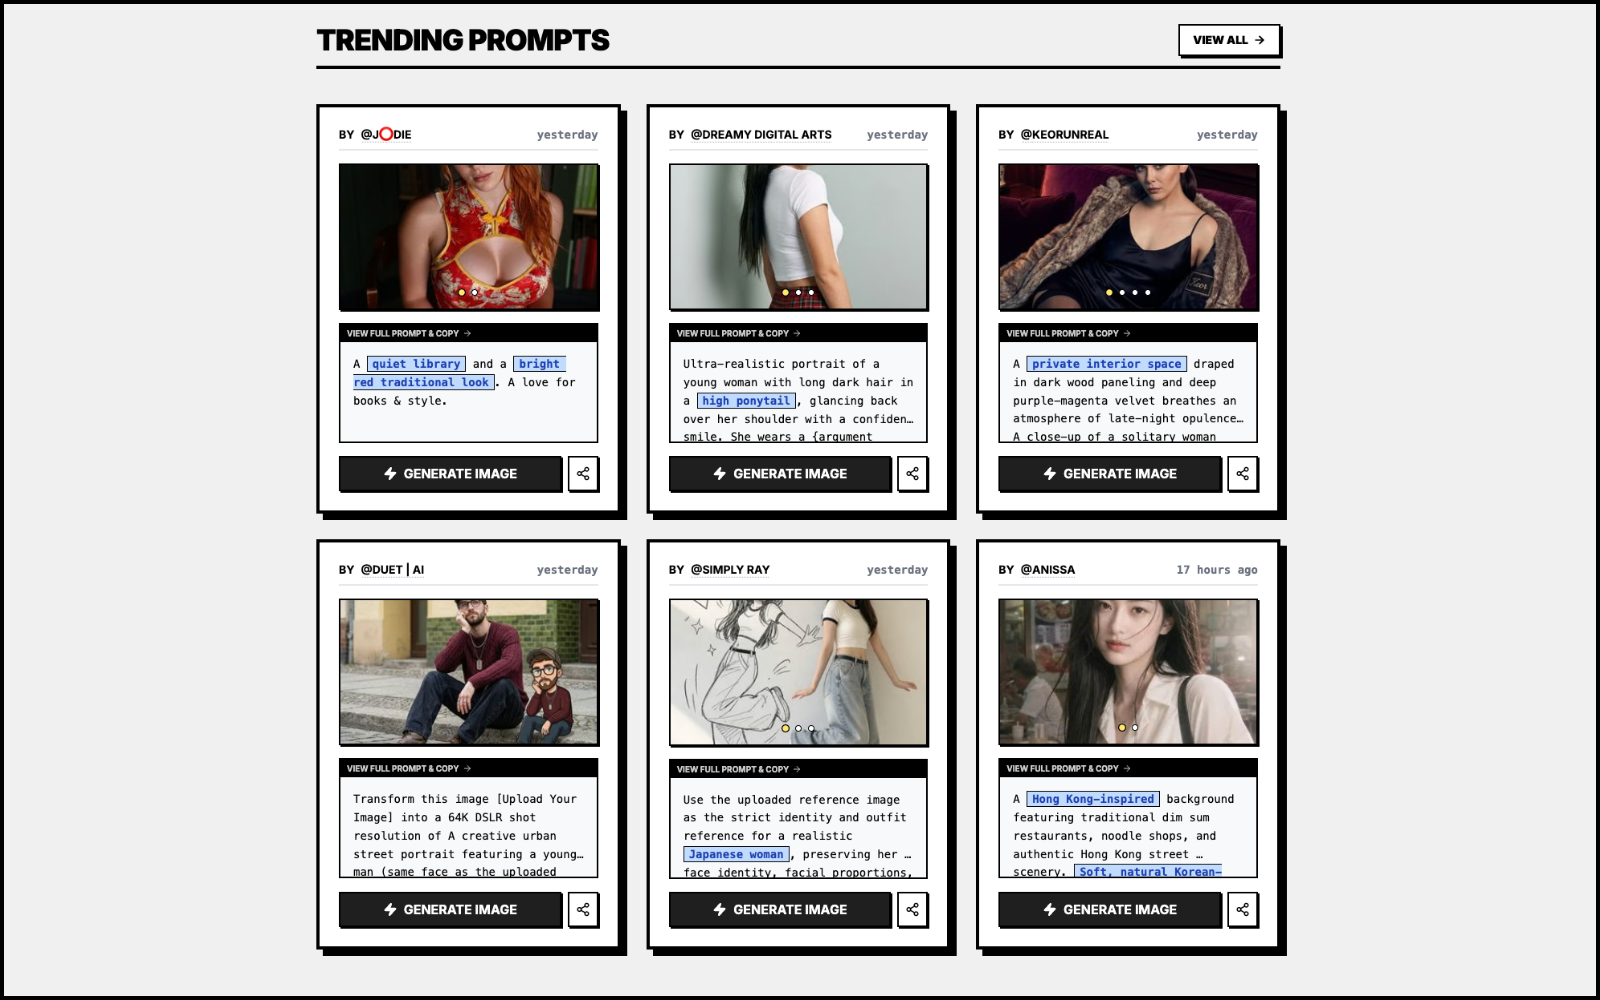
Use prompt galleries for ideas, compositions and useful structures. Replace the subject, scene, references and camera direction with your own requirements.
Do not assume a huge prompt is better because it produced one good preview. You rarely see the failed generations, earlier edits or reference images used before the final result.
10. What Should You Do When Nano Banana Blocks a Normal Prompt?
Nano Banana checks both the prompt and the generated image. Google’s current documentation lists separate safety categories for sexual content, faces, prohibited material, violence and other risks. The API may also return an IMAGE_SAFETY response when the prompt passes but the resulting image does not.
Some requests should be blocked. Google prohibits sexually explicit material, non-consensual intimate imagery, child exploitation and attempts to bypass its safety systems.
The frustrating part is that normal commercial work can also be caught.
A bikini campaign, lingerie advertisement or an adult model drinking coffee in a kitchen may still trigger a refusal. One colleague producing AI bikini advertisements found that normal beach images became less predictable as the filters changed.
That is anecdotal, but it makes sense when both the text and references are being checked.
For permitted commercial content, write the prompt like a photographer or fashion director:
Create a summer swimwear campaign featuring an adult female model wearing a blue two-piece bikini in a bright Mediterranean kitchen. She is standing beside the counter holding a coffee cup. Natural morning light, waist-up composition and clean commercial photography.
Use normal garment, pose, lighting and composition terms. Avoid wording such as “minimal coverage,” exaggerated descriptions of body exposure, fetish language or sexualized instructions when those details are not needed.
More technical wording does not mean giving the model a detailed anatomical description. It means describing the garment, pose and composition precisely.
For example:
- “Triangle bikini top with narrow shoulder straps”
- “Tailored leather harness-inspired menswear”
- “Open blazer over a fitted bodysuit”
- “Three-quarter pose with one shoulder closer to the camera”
These phrases describe visible design and composition. If the intended image is explicitly sexual or fetish content, changing the name of it does not make the request permitted.
Reference crops can also cause problems. In our experience, a cropped body reference without a visible face can sometimes create identity confusion or trigger a refusal. Google does not document a rule saying that cropped faces automatically cause a deepfake block, so treat this as an observation, not a confirmed explanation.
When possible, provide a complete reference and explain its role:
Image 1 is the identity reference for this fictional adult model. Image 2 is used only for the bikini design and pose. Preserve the identity from Image 1 and do not combine the two faces.
A complete reference may help the model understand the subject, but it can also cause identity mixing when several people are visible. Clear reference roles matter.
If a permitted prompt is blocked:
- Check whether the error came from the prompt, generated image, quota or another technical failure.
- Remove irrelevant wording.
- State clearly that the subject is an adult where age could be ambiguous.
- Use standard fashion and photography language.
- Give every reference image one role.
- Try a complete, uncropped reference when appropriate.
- Split a complicated transformation into smaller edits.
- Retry from the clean original if repeated edits have damaged the image.
Do not start hunting for obscure old synonyms simply to trick the filter. The point is to describe a normal permitted image professionally, not disguise a prohibited request.
Google explains its current image-safety categories in the Gemini image generation and responsible AI documentation. Its Generative AI Prohibited Use Policy also prohibits attempts to circumvent safety filters.
Nano Banana Prompting FAQ
What is the best Nano Banana prompt structure?
Start with the operation, then describe the subject, action, scene, composition and visual look. When using references, explain what each image controls before describing the new result.
Are long Nano Banana prompts bad?
No. Long prompts can work well when every section provides useful information. Problems come from repetition, conflicting instructions and trying to control details the model was already handling.
Are longer Nano Banana prompts better?
No. In our test, the long prompt gave us more scene control but did not produce clearly better image quality than the short prompt.
Why does Nano Banana ignore parts of a prompt?
The instructions may conflict, the request may contain too many small details, or the model may focus on the main composition. Remove competing directions and add structure around the part it keeps misunderstanding.
Should I use negative prompts with Nano Banana?
Describe the wanted result first. A short list of exclusions can help during precise edits, but a huge negative list can create more conflicts.
How many reference images should I use?
Use the references that provide information the model needs and give each image a clear role. More references do not guarantee better identity or composition.
Should I describe a face when I already have a face reference?
Usually, no. Tell Nano Banana to preserve the facial identity from the reference. Add written facial details only when the model repeatedly gets something wrong or when you want to change that feature.
Should I edit one thing at a time?
It is a useful method, not a strict rule. Related changes can be combined. The bigger risk is repeatedly editing an already edited image until the face and fine details become overprocessed.
Why does Nano Banana block normal swimwear images?
The model checks both the prompt and the resulting image. Normal swimwear content may be caught because of ambiguous age, sexualized wording, the reference image or the generated result. Use clear adult context and standard fashion-photography language.
Does this guide work with Nano Banana 2 and Nano Banana Pro?
Yes. The same prompting principles apply to both. Their speed, cost and ability to handle difficult instructions differ, so the same prompt may still produce different results.
What We Learned
The long prompt gave Nano Banana more control over the apartment, wardrobe, lighting and camera direction.
It did not give us a clear improvement in image quality. The faces still changed, one head looked too large and some of the skin treatment ignored the prompt.
The short prompt reached the same quality range with a few sentences. It also gave the model more freedom, which led to more variation and one strange phone-interface result.
For a simple portrait, 6,000 characters were not needed. For a crowded scene, detailed product campaign or multi-reference edit, a longer prompt could make sense.
Keep each block short, give every reference a role and learn what the model can handle. Prompt length is not the main problem. Conflicting instructions and unnecessary detail are.
Sources
The conclusions in this guide are based on our six image generations and previous reference-image tests. Technical details were checked against:
- Google Cloud: The Ultimate Nano Banana Prompting Guide
- Google AI for Developers: Gemini Image Generation Documentation
- Google AI for Developers: Gemini API Safety Settings
- YouMind OpenLab: Awesome Nano Banana Pro Prompts
- YouMind: Nano Banana Pro Prompt Gallery
- LaoZhang AI Blog: Nano Banana Pro Safety Filters, a commercial third-party source whose performance claims have not been independently verified.