How to Create a Consistent AI Character Without LoRA Training
TGK tested a four-image Nano Banana Pro process for keeping the same AI face and body across completely different scenes without training a LoRA.

Creating good-looking AI faces is easy now. Preserving the same person across different scenes, outfits and lighting setups is still quite tricky.
Change the camera angle and the face can suddenly look like a distant relative. The jaw changes, the body gets wider, the age shifts and the model quietly replaces half of the person while keeping the hairstyle.
Yes. For still images, you can keep the same AI character without training a LoRA.
Start with one strong source, create a separate face-ID master and full-body master, then tell Nano Banana what each reference controls. A LoRA becomes more useful for frequent video, automation and very high-volume production.
A LoRA can help, but you do not automatically need one, even if you are building a long-term virtual influencer.
Modern reference-based image models can maintain the same character across an ongoing image account when the source material is strong and the references are used properly. You can keep returning to the same approved face, body and angle references for as long as the character exists.
LoRA training itself is not especially difficult either. The difficult part is preparing enough clean images of exactly the same person. If the face, body or age has already drifted across the dataset, the LoRA can learn an average of those different versions instead of fixing them.
The most important part of this entire process is therefore not the length of the prompt, the number of references or whether you trained a file.
It is the quality of the source images.
Start with a bad reference and you can spend the rest of the project trying to repair a problem you created on day one. Start with a sharp, clean and genuinely useful source and the whole process becomes cheaper and easier.
A small studio-style master portfolio can often be created for less than $5 if you know how to prompt and reject weak results early. Platform prices vary, but spending a little more attention at the beginning normally wastes far less money later.
The TGK Process
Four images take the character from a random source to a completely new campaign.
Choose the source
Generate one fictional face worth keeping. Do not build on a weak first result.
Lock the face
Create a straight-on, neutral face-ID master. This becomes Image 1.
Lock the body
Create a separate full-body reference with clear proportions. This becomes Image 2.
Build the new scene
Attach Images 1 and 2, explain their jobs and change everything around the character.
The rule: add another reference only when the new angle needs information the two masters do not show.
Our test used a fictional male model, but the same system works for female characters.
The four stages shown in this article are:
- The original casual source image.
- The face-ID master, called Image 1 in later prompts.
- The full-body master, called Image 2.
- The finished Sicilian fragrance campaign.
Can You Create a Consistent AI Character Without a LoRA?
Yes. You can also run a long-term virtual influencer without one.
A LoRA is useful, but it is not a requirement for taking a character seriously. With Nano Banana Pro, a strong reference system can remain the permanent workflow rather than merely serving as preparation for future training.
This is particularly practical for images. You attach the approved references, give each one a clear purpose and change the scene around them.
A LoRA becomes more attractive when:
- Attaching references to every generation is slowing down production.
- The workflow is automated.
- The same character is being produced in very high volumes.
- You want to create a lot of video, particularly with models such as Wan.
- A video model accepts a reference image but still produces too much identity drift through movement and different shots.
Reference-image video generation can work well. The problem is that identity has far more opportunities to drift in video than in one still image. The model must preserve the person through movement, changing expressions, different camera positions and hundreds of individual frames.
For regular video production, a good character LoRA can therefore be more efficient and stable. It is still not magic, and a weak dataset can create a drifting LoRA too.
For image-only accounts, Nano Banana references may be enough indefinitely.
Step 1: Start With One Source Face Worth Keeping
We did not begin this test by writing a 40-line identity document.
We asked an LLM for a short prompt for a random fictional male model. Then we generated until we found one face interesting enough to keep.
This was the source prompt:
PROMPT 1 Original source image
No reference image attached.
Photorealistic casual smartphone photo of a very attractive 23-year-old fictional man with a refined Japanese and European mixed look, striking supermodel-level facial features, defined bone structure, clear skin, and naturally elegant masculine beauty.

He has longer blonde hair with a soft old-money feel, slightly layered and relaxed, framing the face.

Indoors in a normal stylish apartment, natural candid vibe, slightly amateur iPhone-style photo, not too polished, simple casual clothes, relaxed confident presence, believable lighting, realistic skin texture, subtle luxury aura, natural and interesting-looking, not overly professional or editorial.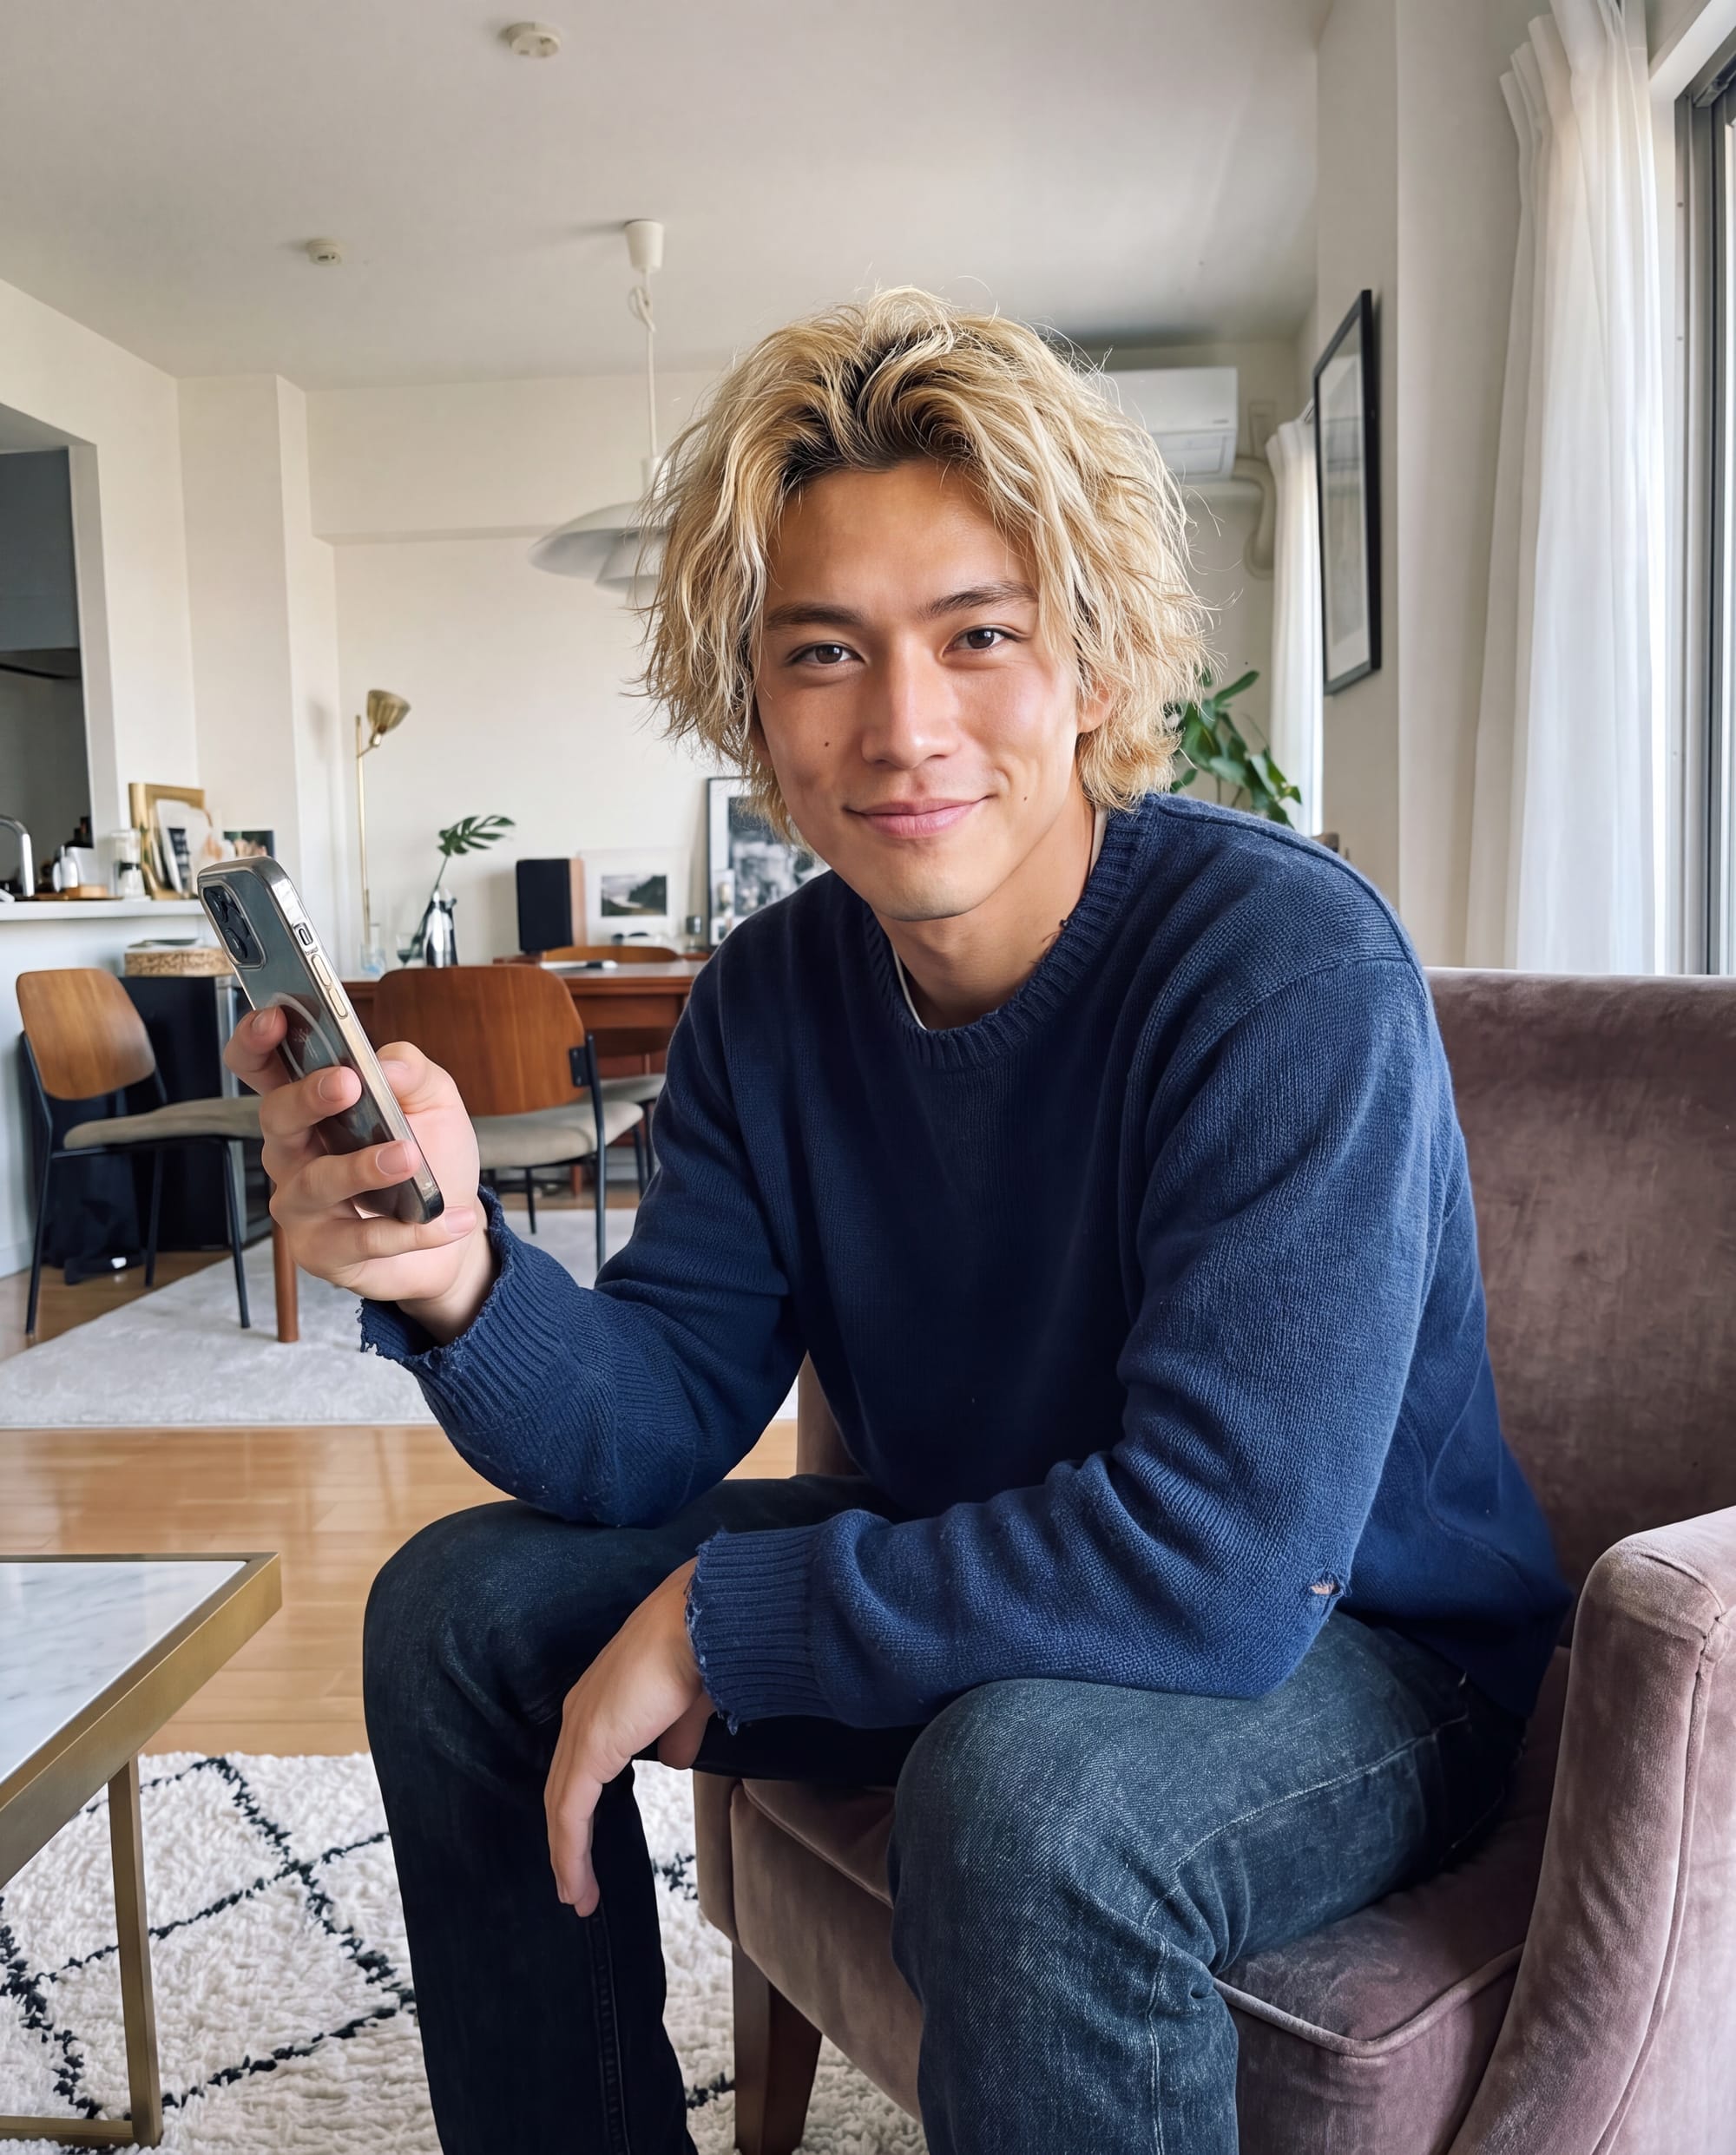
This first image does not need to be a formal studio portrait. It needs to show enough clear facial information for the next step.
The source should have:
- A clearly visible face and hairline.
- Useful detail around the eyes, nose, mouth and jaw.
- Believable skin detail.
- An angle without extreme camera distortion.
- Enough individual character to avoid becoming another generic AI face.
Do not waste time trying to build an entire character from a shitty-quality face simply because you already have it saved. Making one better source now is usually cheaper than correcting identity drift across the next 50 images.
For a completely new fictional person, one strong source can be enough. You are establishing the identity rather than trying to recover an existing person from several angles.
One or two matching face references are normally safer than uploading several slightly different versions. More references can make the model average the faces instead of preserving one of them properly.
The goal is not to fill every available reference slot. It is to provide the clearest useful information.
Step 2: Turn It Into a Face-ID Master
A good source photograph can still be a poor permanent identity reference.
A tilted head changes the visible jaw. Strong side lighting changes the nose and cheekbones. Hair across the face hides useful information. A large smile moves the cheeks, eyes and mouth.
The face-ID master removes those variables.
It should be straight-on, centred and photographed at eye level. Keep the complete hairline, both ears and the jaw visible. The expression should be neutral but alive.
This stage controls the face. It does not need instructions about the full body. Body proportions are a separate job and come next.
These are the prompts used in our test, with the unnecessary body block removed from this face-ID version:
PROMPT 2 Create Image 1 - Face-ID master
Attach the original source image only.
IDENTITY & OPERATION:

Use the provided image as the sole identity reference. Create the same fictional man as a definitive facial-ID master reference. Preserve all facial identity features exactly. Keep his real apparent age, natural asymmetry and individual character.

SCENE:

Clean studio environment with a plain seamless neutral mid-grey background. The background is smooth, evenly illuminated and free from visual distractions.

COMPOSITION & FRAMING:

Extremely tight, face-dominant front-facing beauty-reference composition.

The face occupies approximately 75–80% of the image height. Frame from a small amount of clear space above the highest point of the hair to just below the base of the neck.

The complete hairline, forehead, both ears, jawline and full neck remain visible. Only very small portions of the shoulder line may appear in the bottom corners. No upper chest or broad shoulder area is visible.

Perfectly centred composition with the eyes positioned slightly above the horizontal centre of the frame. Eye-level camera, straight-on perspective and equal spacing on both sides of the face.

POSE:

Head upright and directly square to the camera. Neck straight and relaxed. Chin held naturally, neither raised nor lowered. No head tilt or rotation.

EXPRESSION & GAZE:

Neutral, relaxed and alive. Lips softly closed, jaw at rest and eyelids natural. Direct calm eye contact with the camera.

WARDROBE:

Plain fitted charcoal-grey crew-neck T-shirt. The neckline remains outside or almost completely outside the crop, with only a minimal hint of fabric allowed at the lower edge. No jewellery or accessories.

LIGHTING:

Large diffused frontal octabox positioned slightly above the camera, with subtle soft fill beneath the face and balanced fill from both sides. Neutral 5500K colour temperature.

Soft dimensional modelling remains visible around the eyes, nose, cheekbones, jaw and neck while the whole face stays evenly readable. Controlled highlights reveal pores and fine skin texture without flattening the face or creating excessive shine.

CAMERA:

Sony α7R V with Sony FE 90mm F2.8 Macro G OSS lens, f/8, ISO 100.

Camera positioned directly at eye level and far enough away to preserve natural facial proportions. The entire face, hairline, ears and neck remain inside the sharp focal plane.

PHOTOGRAPHIC REALISM:

Unretouched studio photography with clearly resolved pores, fine forehead texture, faint under-eye texture, subtle facial redness, small pigmentation differences, minor natural skin irregularities, realistic lip texture, individual eyebrow hairs and individual stubble hairs.

Preserve natural skin translucency, slightly different pore density across the forehead, nose and cheeks, restrained natural highlights and smooth tonal transitions.

OUTPUT FORMAT:

One high-resolution vertical image in 4:5 ratio. Face-dominant crop matching the description above. Neutral colour rendering, clean studio exposure and no text or graphic elements.

PRESERVATION:

Preserve all facial identity features exactly, including the natural hairline, hairstyle, stubble, skin tone and facial asymmetry. Preserve the exact tight framing described above. This image becomes the primary facial identity reference for all subsequent generations.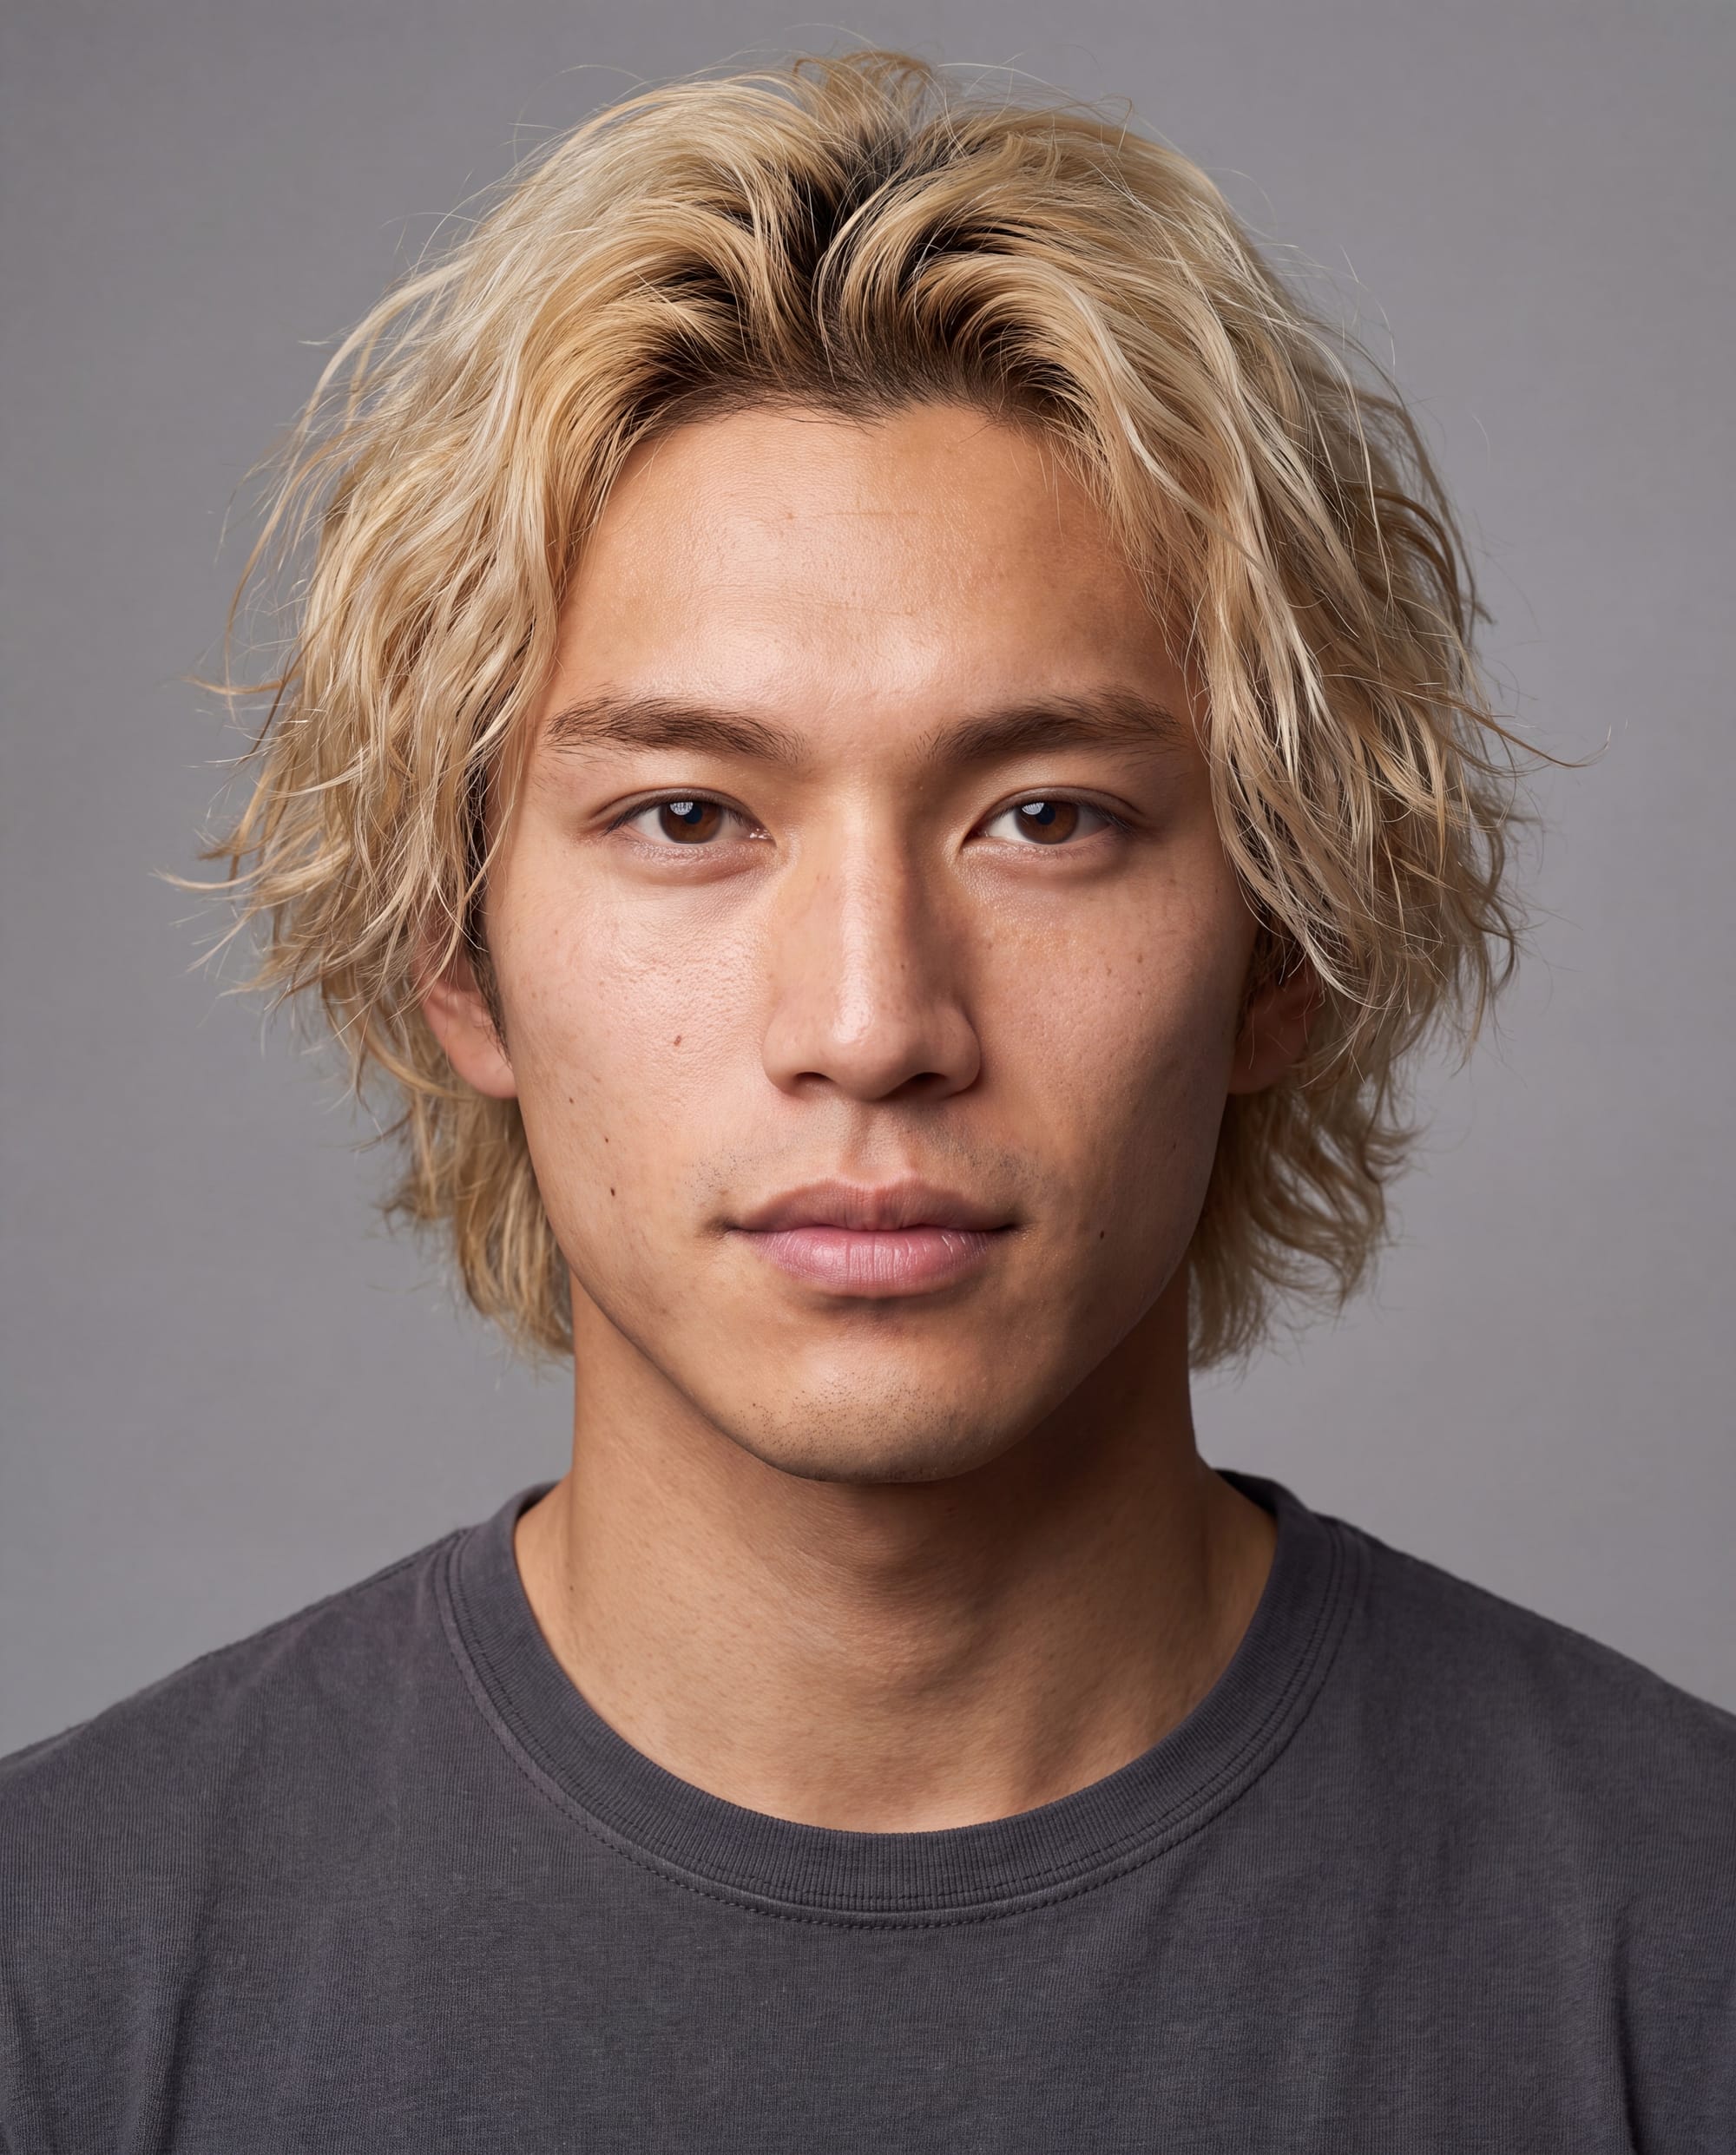
.Once this image is correct, save it separately. Do not keep replacing it with newer lifestyle generations.
If several later edits change the face, return to this master instead of trying to repair an image that has already drifted.
Step 3: Create a Separate Full-Body Master
A consistent face attached to a different body in every image is not a consistent character.
Male characters regularly change in shoulder width, muscle mass, torso length and apparent height. Female characters often shift in bust, waist, hips, height and leg proportions.
The full-body master settles those decisions before complicated scenes are introduced.
Use simple clothing that leaves the proportions readable. Keep the complete body and both feet visible. Avoid extreme low angles, wide lenses and dramatic poses that distort the figure.
If the original source did not show the body, Nano Banana is not recovering hidden information. It is creating a new body under your direction. Review it properly before approving it.
PROMPT 3 Create Image 2 - Full-body master
Attach Image 1, the face-ID master.
IDENTITY & OPERATION:

Use Image 1 as the primary identity reference. Create exactly the same fictional man as a clean full-body master reference. Preserve all facial identity features exactly.

BODY GEOMETRY:

The same man is approximately 188 cm tall with naturally lean, high-fashion male-model proportions.

He has proportionate masculine shoulders, a defined but restrained chest, a long natural torso, a narrow waist, proportionate hips, lean arms, realistic hands and long legs with subtle achievable muscle definition.

Preserve realistic head-to-body scale, neck length, shoulder width, chest depth, ribcage shape, torso length, waist position, hip width, arm length, elbow position, hand size, thigh volume, knee height, calf size and foot size.

His body is naturally fit and genetically suited to runway modelling, with believable human asymmetry and no exaggerated fitness-model geometry.

SCENE:

Plain seamless neutral mid-grey studio background matching Image 1. Clean studio floor with a soft natural contact shadow beneath the feet.

COMPOSITION & FRAMING:

Straight-on full-body composition from the soles of the feet to clear space above the hair. Subject centred vertically and horizontally. Camera positioned far enough away to preserve natural body proportions.

POSE:

Standing directly toward the camera with feet approximately hip-width apart and weight distributed evenly. Arms resting naturally beside the torso with a small readable gap between the arms and body. Hands relaxed, shoulders lowered and posture upright without stiffness.

EXPRESSION & GAZE:

Neutral relaxed expression with lips softly closed and direct calm eye contact.

WARDROBE:

Plain fitted charcoal sleeveless tank top that clearly reveals the shoulder line, chest width, torso length and waist. Fitted black mid-thigh shorts with a simple clean waistband. Barefoot. No jewellery or accessories.

LIGHTING:

Large diffused studio source positioned slightly above and camera-left, with soft neutral fill from camera-right. Even exposure from head to feet, with natural dimensional shadows beneath the jaw, arms, torso, shorts and feet. Neutral 5500K colour temperature.

CAMERA:

Hasselblad X2D 100C with XCD 55V lens, f/8, ISO 64. Camera positioned around mid-torso height and placed at sufficient distance to maintain accurate shoulder width, torso length and leg proportions.

PHOTOGRAPHIC REALISM:

Clean unretouched studio photography with realistic anatomy, skin texture, hands, feet, fabric tension and natural weight distribution. Subtle muscle definition follows the actual body structure rather than artificial shadow enhancement.

OUTPUT FORMAT:

One high-resolution vertical image in 4:5 ratio. Complete body visible, neutral colour rendering and no text or graphic elements.

PRESERVATION:

Preserve all facial identity features from Image 1 exactly. The height impression, build and complete body geometry established in this image become the master body reference for all subsequent full-body generations.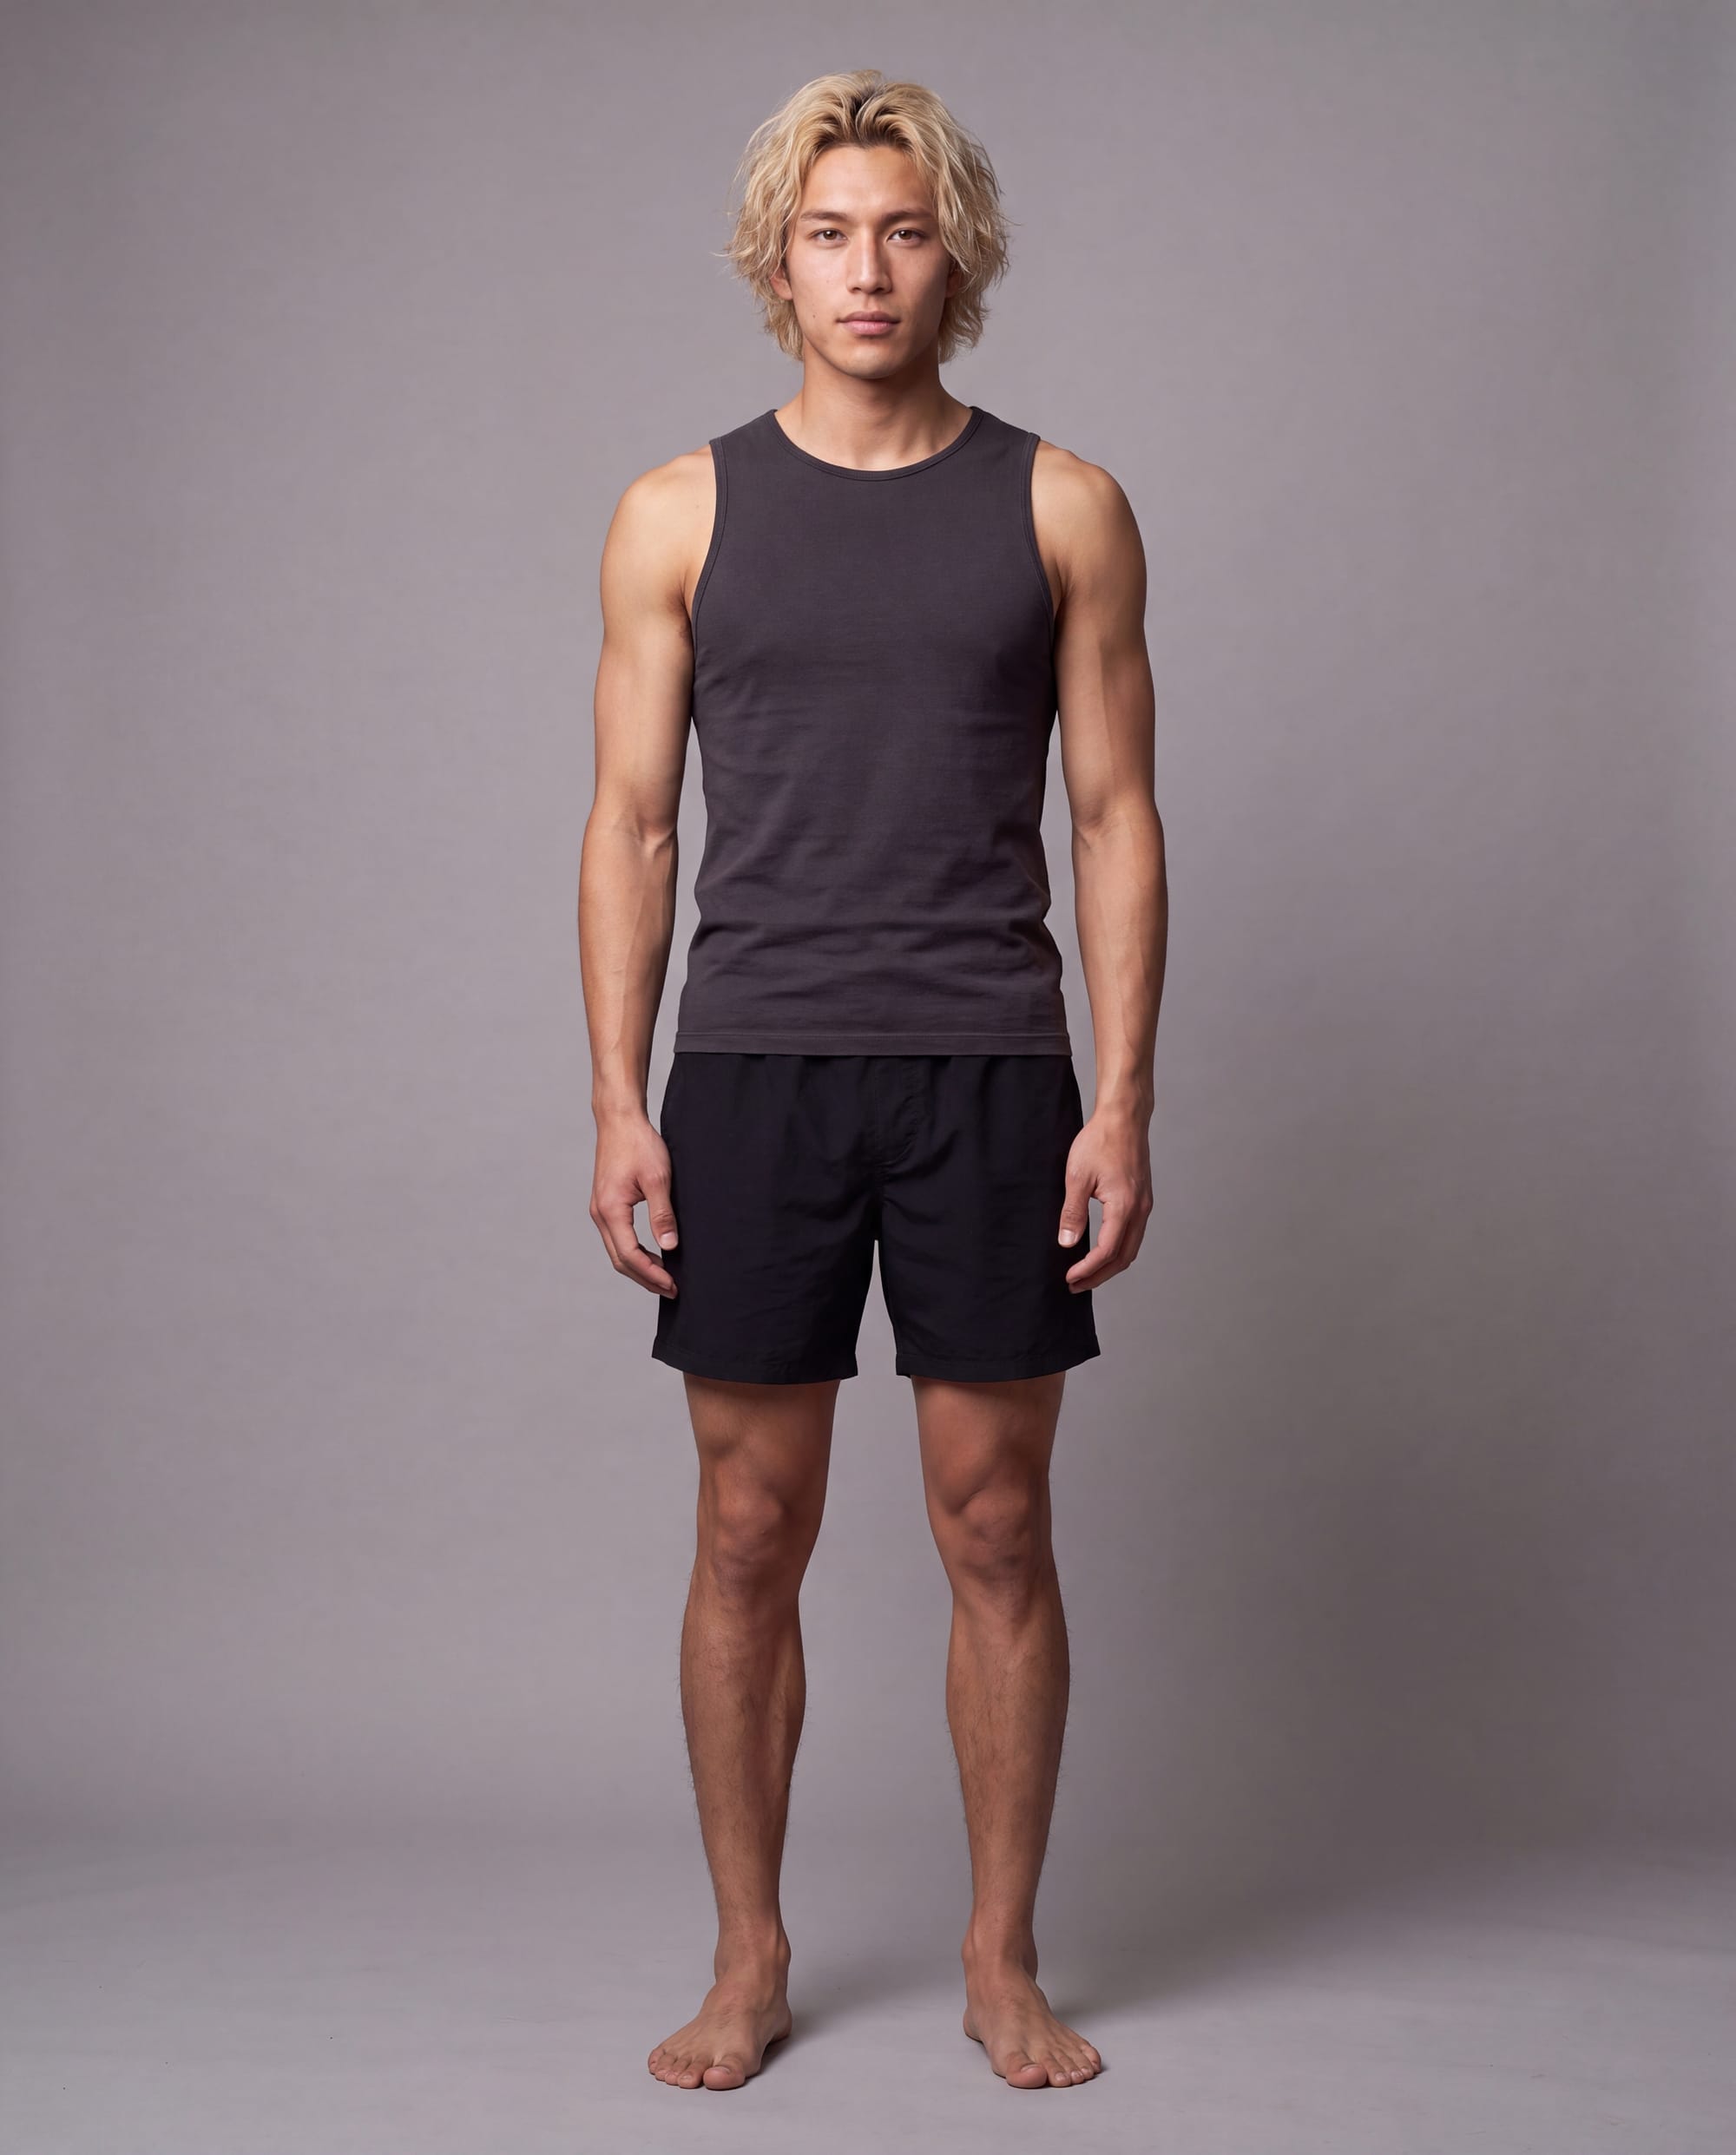
Whenever a later image changes the figure too much, return to this master.
Step 4: Choose References Based on the New Angle
There is no perfect number of references for every generation.
For a normal front-facing or three-quarter image, two references may be enough:
- The face-ID master.
- The full-body master.
For a strong side-profile composition, add a matching side-profile face reference.
For an image where the character faces away, a rear body or rear three-quarter reference can help preserve the hair, shoulders, waist and general figure.
Some side, seated or rear compositions may need three or four references because the normal face and body masters do not show enough information for that angle.
The important point is that every attached image needs a reason to be there.
| New composition | References to use |
|---|---|
| Front or three-quarter portrait | Face-ID master; body master only if proportions are visible |
| Front or three-quarter full body | Face-ID master and full-body master |
| Strong side profile | Main masters plus a matching side-profile reference |
| Rear three-quarter image | Main masters plus a rear or rear three-quarter reference |
| Complicated hairstyle from behind | Main masters plus a matching rear hair reference |
| Close facial crop | One excellent face master may be better than several mixed faces |
Google says Nano Banana Pro supports five input images with high fidelity and up to 14 images in total. Nano Banana 2 supports resemblance for up to four characters and fidelity for up to 10 objects. Those are technical limits, not targets. Google’s Gemini image-generation documentation
Face identity usually needs one or two strong images. Adding more can become counterproductive when they show slightly different versions of the person.
Body and angle references work differently. A side body image or rear view may provide information that the front-facing masters genuinely cannot show.
More references help when they provide new, compatible information. They hurt when they merely provide more versions of the identity.
Step 5: Tell Nano Banana What Each Image Controls
Do not make Nano Banana guess why each reference was attached.
For a normal two-reference generation, the identity opener can stay short:
Using the provided reference images for identity. Image 1 is the face reference. Image 2 is the body reference. Preserve facial identity from Image 1 exactly. Preserve body proportions from Image 2 exactly.
If you add a third reference for the angle, explain its job:
Image 3 controls the visible side-profile structure for this composition. Use it for the profile angle without averaging or redesigning the face from Image 1.
The remaining prompt describes the new image.
The order TGK normally uses is:
- Identity and reference roles.
- Scene and action.
- Composition and framing.
- Pose and hands.
- Expression and gaze.
- Body preservation.
- Wardrobe and hair.
- Lighting.
- Camera treatment.
- Final preservation instruction.
This makes bad results easier to diagnose.
If the face is correct but the body becomes wider, check the body master and body-preservation instructions. There is no reason to rewrite the face, lighting and entire room.
Each block needs one clear job. Repeating the same warning in five different ways can make the generation worse instead of better.
Step 6: Create the Finished Scene With Nano Banana Pro
For the final test, we moved the character from the plain studio into a completely different environment: a Sicilian luxury fragrance campaign.
This is the point of the workflow. The location, wardrobe, pose and lighting can all change while Image 1 controls the face and Image 2 controls the body.
Here is the complete prompt we used:
PROMPT 4 Sicilian fragrance campaign
Attach Image 1 and Image 2.
IDENTITY & OPERATION:

Use Image 1 as the primary facial identity reference and Image 2 as the body-geometry reference. Create exactly the same fictional man in an original luxury fragrance campaign. Preserve all facial identity features exactly and maintain the established height impression and body structure.

BODY GEOMETRY:

Preserve the lean high-fashion proportions established in Image 2: realistic head-to-body scale, long natural torso, proportionate shoulder width, restrained chest development, narrow waist, long arms, realistic hand size and long proportionate legs.

The clothing follows the body accurately through natural shoulder tension, chest volume, waist placement, sleeve folds and trouser drape.

SCENE:

A historic Sicilian palazzo terrace overlooking the Mediterranean during late afternoon.

Warm cream limestone walls, aged stone flooring, dark wooden shutters, a sheer ivory curtain moving in the coastal breeze and a deep-blue sea visible beyond the terrace. Sparse dark cypress trees appear in the distance.

A generic unbranded fragrance bottle made from heavy smoked glass rests on a dark stone console beside him. The setting feels sensual, elegant and cinematic, with the visual language of an original Italian luxury-house fragrance campaign and a Vogue Italia editorial.

COMPOSITION & FRAMING:

Vertical medium-full campaign composition from approximately mid-thigh to above the head. The model occupies the dominant central area while the fragrance bottle, palazzo architecture and Mediterranean background remain clearly readable.

Camera positioned slightly below chest height with a restrained natural upward perspective.

POSE:

He stands beside the stone console with his torso turned three-quarter toward camera-left. One hand rests loosely near the fragrance bottle while the other adjusts the open cuff of his shirt.

Weight settles naturally into one leg. One shoulder sits slightly lower than the other. His head turns back toward the camera while the coastal breeze moves several strands of hair, the open shirt and the nearby curtain.

The pose feels controlled but captured naturally between formal campaign frames.

EXPRESSION & GAZE:

Calm, self-possessed and slightly distant. Lips softly closed, jaw relaxed and eyelids natural. His gaze is directed just past the camera with restrained confidence.

WARDROBE:

Black lightweight silk-linen shirt with a relaxed open collar and the top three buttons undone. Sleeves rolled once below the elbows.

High-waisted ivory pleated trousers with clean Italian tailoring and a natural flowing drape. One understated vintage-style gold watch. Dark-brown leather loafers.

LIGHTING:

Warm late-afternoon Mediterranean sunlight enters from camera-left and creates directional highlights across the face, neck, shirt, hands and limestone.

Cooler open-sky fill shapes the shadow side, while warm reflected light rises naturally from the pale stone floor. The model, clothing, fragrance bottle, architecture and background share one coherent light direction and colour environment.

Skin remains detailed and dimensional beneath the polished campaign lighting.

CAMERA:

Hasselblad X2D 100C with XCD 55V lens, f/5.6, ISO 64. Medium-format campaign photography with realistic perspective, controlled depth of field and enough environmental focus to retain the palazzo and Mediterranean setting.

PHOTOGRAPHIC REALISM:

Genuine high-end commercial fashion photography with visible natural pores, individual stubble hairs, realistic hands, accurate silk-linen texture, believable trouser construction, natural wind behaviour and restrained editorial colour grading.

The fragrance bottle has realistic scale, glass thickness, reflections and contact with the stone surface.

OUTPUT FORMAT:

One high-resolution vertical campaign image in 4:5 ratio. No logos, brand names, captions or graphic overlays.

PRESERVATION:

Preserve all facial identity features from Image 1 exactly. Preserve the height impression, shoulder width, torso length, arm length, hand size and complete body geometry from Image 2. Environmental styling, expression and pose may change while identity and anatomy remain consistent.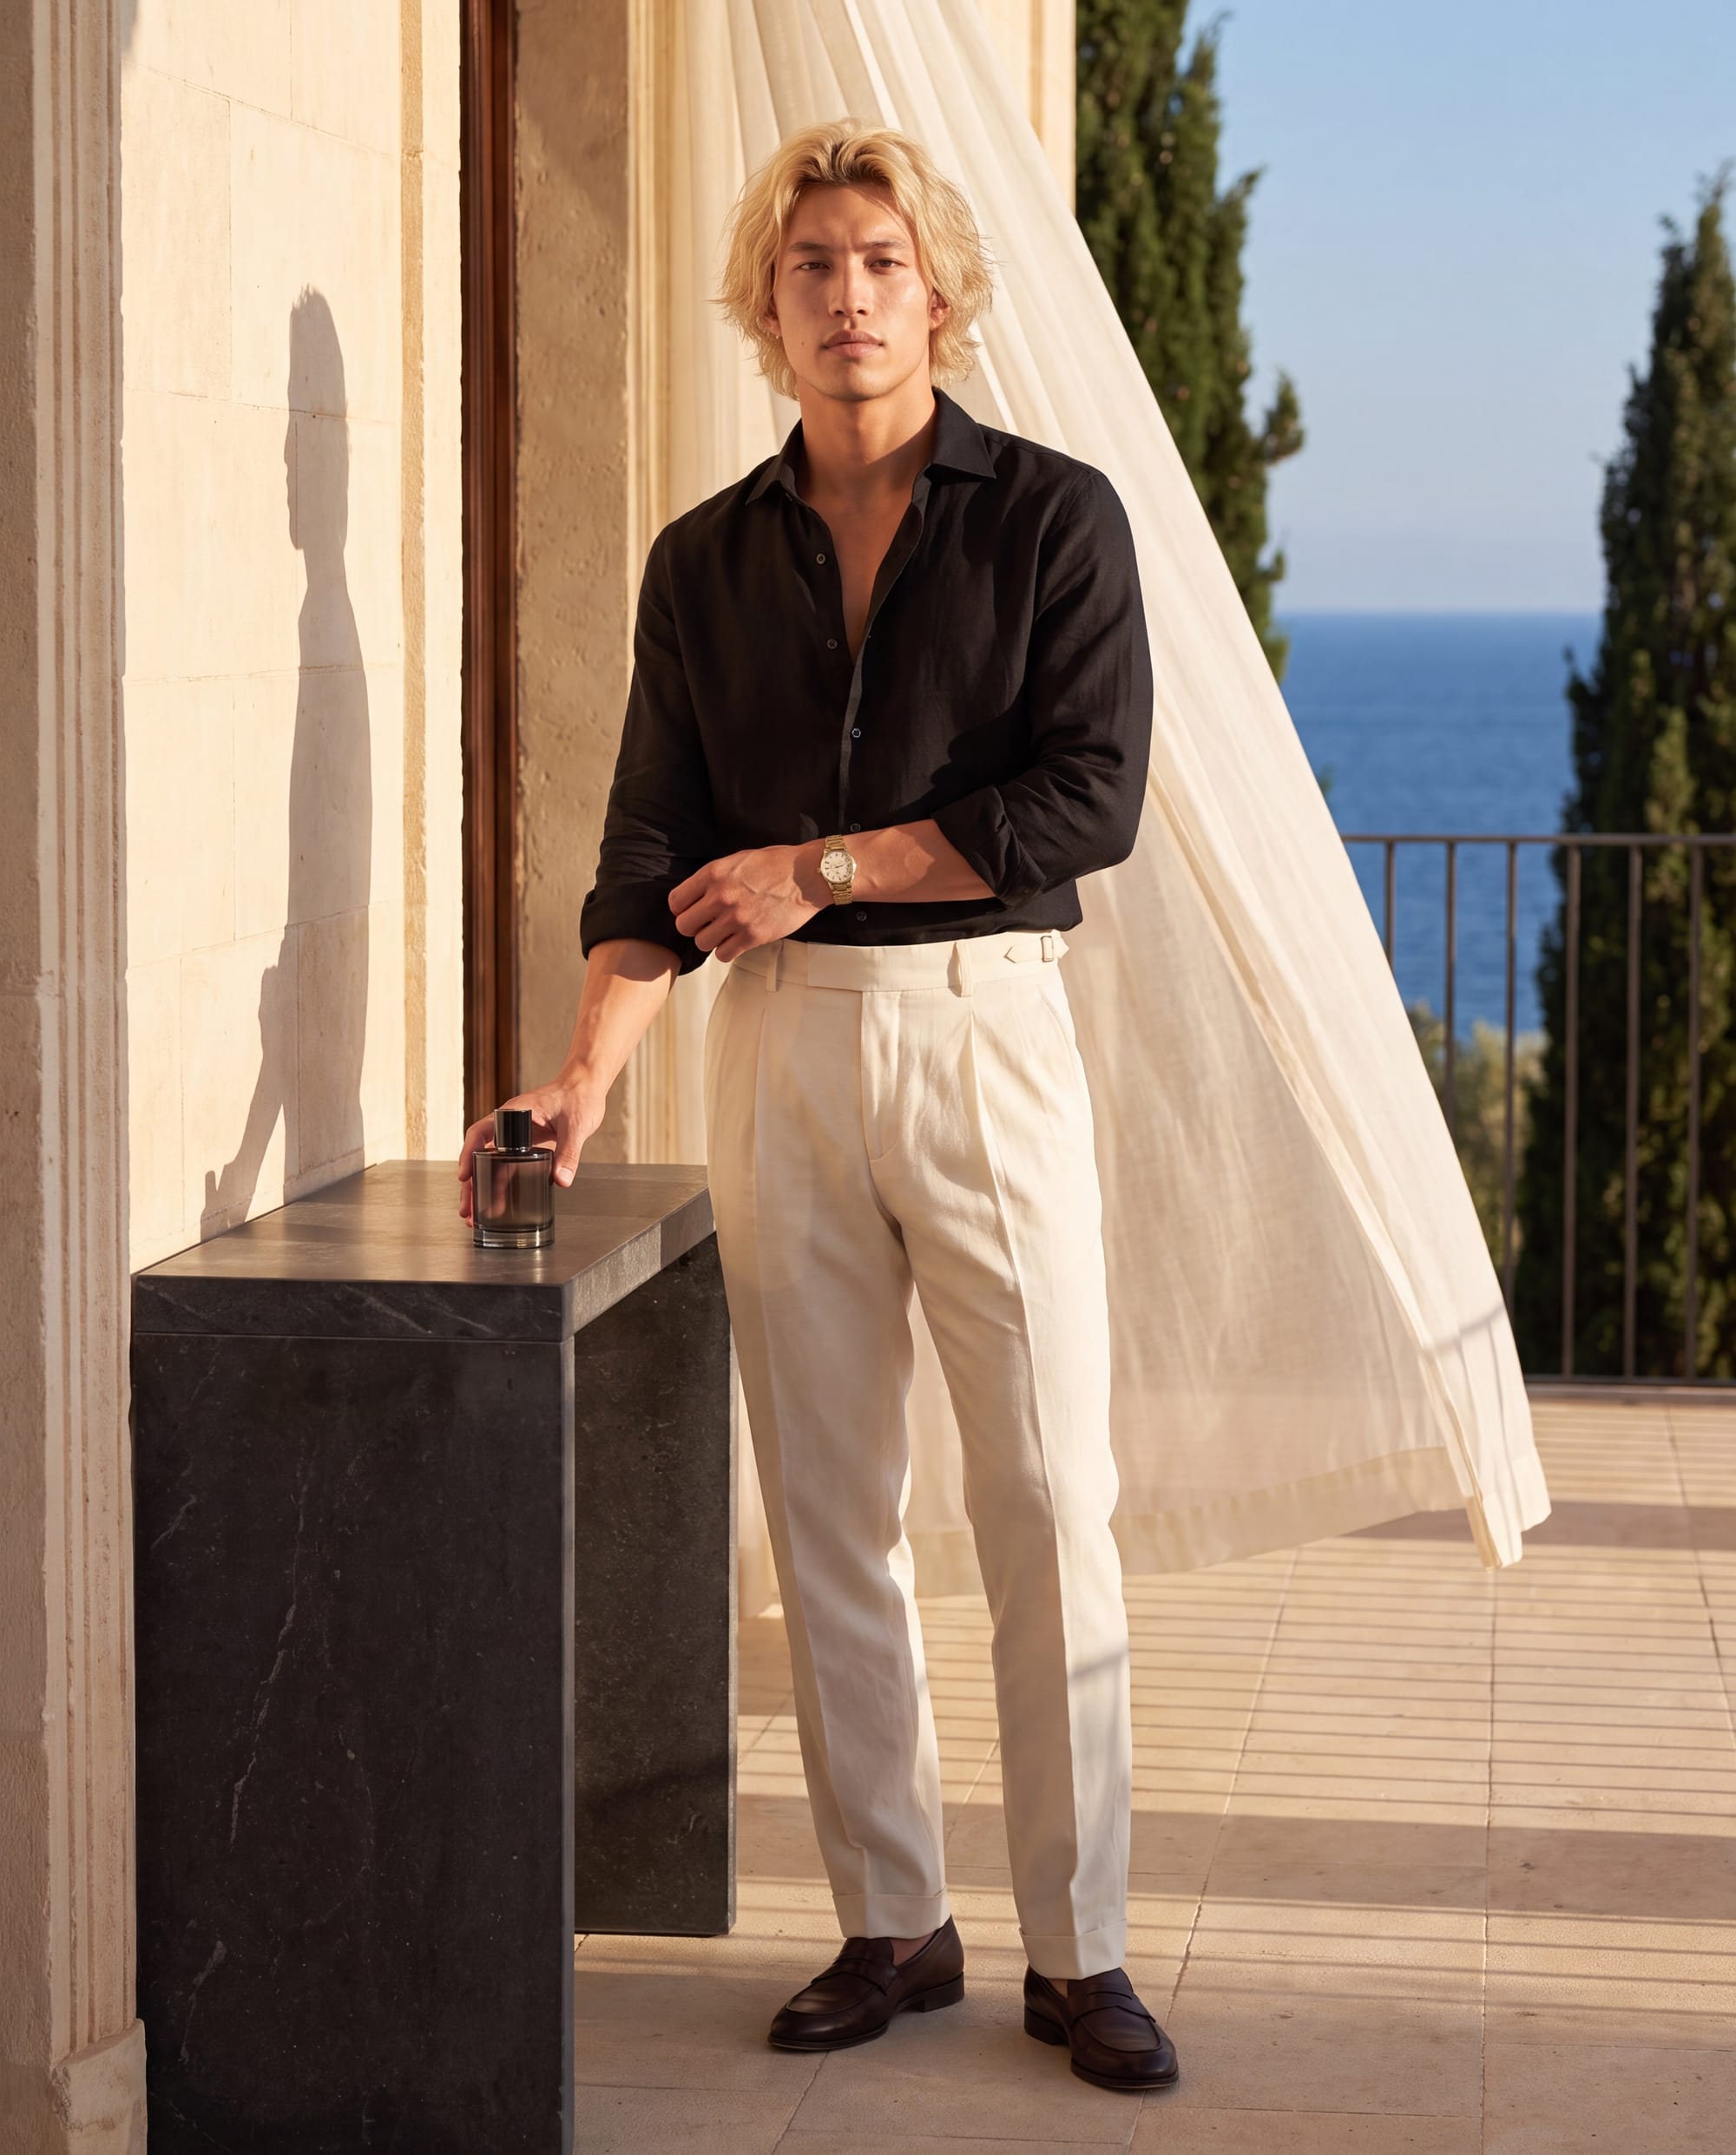
This prompt is long, but every section controls something visible.
A detailed prompt is not automatically better. It becomes a problem when sections repeat each other, contradict each other or demand effects the model cannot realistically combine.
TGK used Nano Banana Pro for the main generations in this process. In our seven-model image generator and editor test, Pro produced our strongest human photorealism.
Nano Banana 2 was often better for smaller edits to an image that was already good. When we asked it to remove jewellery, replace a phone case or change one clothing colour, it was less likely to rebuild unrelated parts of the image.
Our practical workflow is therefore:
- Nano Banana Pro for master references and new finished scenes.
- Nano Banana 2 for smaller controlled corrections.
That is our testing result rather than a universal rule. Google positions Nano Banana 2 as its general-purpose model and Nano Banana Pro as its premium option for complex instructions and professional asset production.
Nano Banana Pro vs Nano Banana 2 vs LoRA
| What you need | Best starting option | Why TGK would use it |
|---|---|---|
| Strong human photorealism | Nano Banana Pro | Our strongest results for skin, hair, lighting and materials |
| Small controlled image edits | Nano Banana 2 | Usually changes less outside the requested edit |
| Long-term image influencer | Pro references or LoRA | Both can work; training is not compulsory |
| Regular character video | LoRA often helps | Identity has more opportunities to drift through motion and multiple shots |
| New character without a dataset | Nano Banana Pro | Fast to establish and easy to correct before larger production |
| Automated high-volume work | Well-trained LoRA | Reduces manual management of several references |
A LoRA is not automatically more consistent simply because it has been trained.
Even with a decent dataset, identity drift can remain. The LoRA may preserve the general person while changing smaller facial traits, body proportions or age under difficult prompts and angles.
Its main advantage is efficiency and model-specific control, not guaranteed perfection.
Nano Banana’s advantage is flexibility. You can replace one weak reference, add a missing side angle or return directly to the approved face master without retraining anything.
Why Consistent AI Characters Can Still Look Fake
Bad source references are the biggest reason.
If the original face is blurry, overly smooth, strangely sharpened or already looks obviously AI-generated, the model has weak information to preserve. It can keep producing the same character while every image still looks fake.
The better the reference quality, the better the final result normally becomes.
Prompt overload is the second major problem.
People assume a bigger prompt produces a more professional image, so they stack every impressive-sounding phrase they can find:
Masterpiece, flawless, ultra-beautiful, 64K, hyper-detailed, razor sharp, cinematic smartphone photograph, Hasselblad quality, natural amateur selfie, perfect studio lighting.
Half of that says very little. Some of it directly contradicts the rest.
A natural amateur smartphone photograph and a perfectly controlled luxury studio campaign are different instructions. Extreme sharpness fights against natural camera softness. “64K” does not explain how the skin, light or camera should behave.
The model then averages incompatible demands and creates a polished but fake-looking compromise.
Overdescribing the identity can create the same problem. If the reference already shows the face, you do not need six separate paragraphs describing the eyes, nose, jaw, cheekbones and ears. Your written version of the face may compete with the actual reference.
Use the image for identity. Use the prompt for what changes.
Instead of decorative resolution words, describe visible details:
Natural skin with fine texture, small colour differences and believable highlights. Keep slight camera softness. Avoid overly smooth or excessively shiny skin.
Expressions should also be physical rather than vague.
“Sexy expression” gives the generator permission to change the eyes, lips, cheeks and complete facial energy.
“Chin slightly lowered, eyes looking past the camera and lips relaxed and closed” explains what the existing person is doing.
The goal is control, not prompt length.
Camera Position Matters More Than Camera Brands
TGK has tested Sony, Canon, Nikon and Hasselblad wording across many modern photography prompts. Changing the brand name alone rarely creates a major difference.
Camera position, distance, perspective, framing, focal length and lighting matter much more.
A close smartphone photograph can widen the centre of the face. An 85mm-style portrait normally places the camera farther away and creates flatter facial perspective. A low camera position can make the legs appear longer and the head smaller.
The character may therefore look different even when most of the real facial identity has survived.
Older film-camera references can influence colour, contrast and grain more strongly because they suggest a recognisable photographic period.
For modern photography, an expensive camera name will not rescue a bad reference or contradictory composition.
When Is a LoRA Actually Worth Training?
Train a LoRA when it makes the workflow more efficient, not because every serious AI character supposedly needs one.
For image production, reference-based Nano Banana generation can remain the permanent system. A long-running virtual influencer can keep using approved face, body and angle references without training.
A LoRA becomes more useful for:
- Automated production.
- Hundreds or thousands of recurring generations.
- Workflows where attaching references each time becomes inconvenient.
- Models that do not handle multiple identity references well.
- Frequent video creation.
- Wan workflows where the same person must survive many movements, shots and clips.
Wan and other video models can use reference images, but identity is generally harder to preserve in moving footage than in a single image. A trained character LoRA may give the model a more persistent understanding of the person across repeated video production.
The dataset still decides whether that LoRA is useful.
If the face changes across the training images, the file can learn an average. If most images use the same expression, outfit or lighting, those details may keep returning. If the body changes, the LoRA may preserve the face while remaining unstable everywhere below it.
The sensible order is:
- Establish the identity with strong master references.
- Produce a clean and varied image portfolio.
- Continue using references while the workflow remains convenient.
- Train a LoRA later if volume, automation or video production gives you a real reason.
The Nano Banana workflow is therefore not merely a temporary substitute for LoRA training. It can also produce the clean dataset needed if you eventually decide training is worth it.
Frequently Asked Questions
Can one photo keep an AI character consistent?
One strong image can be enough to establish a new fictional identity and create the first master references.
A blurry or heavily processed image is not enough merely because the face is technically visible.
How many face references should I use?
Usually one or two.
Add another face reference when it shows a genuinely necessary angle, not simply because another slot is available.
When would I use three or four references?
When the new composition needs information the normal face and body masters do not contain.
A side-profile or rear-facing scene may benefit from a matching profile, rear-body or hairstyle reference.
Is Nano Banana Pro better than Nano Banana 2?
For TGK’s main character generations, Nano Banana Pro produced stronger human photorealism.
Nano Banana 2 was often more reliable for making one small edit without changing unrelated details.
Do I need a LoRA for a long-term virtual influencer?
No.
You can keep using the same approved Nano Banana references for long-term image production. A LoRA becomes worthwhile when it improves speed, automation, volume or video consistency.
Is LoRA better for video?
It can be considerably more useful there.
Movement and multiple frames create more opportunities for identity drift. A strong LoRA can make recurring character video production more efficient, particularly in Wan-based workflows.
It still depends on the quality of the dataset and training.
Can a LoRA still have identity drift?
Yes.
A LoRA can preserve the general identity while changing smaller facial traits, body proportions or age. Training does not guarantee perfect preservation.
Why does my character look fake?
Check the source image before rewriting the entire prompt.
Blurry, overly smooth or already fake-looking references are usually the first problem. Contradictory instructions and empty terms such as “64K” can make it worse.
Should the prompt be short or detailed?
It should be as detailed as the image requires.
Every section needs a clear purpose. A long prompt filled with repetition and contradictions is worse than a shorter prompt built around strong references.
How much does it cost to build good master references?
A small studio-quality starting portfolio can often be created for under $5 when prompts are prepared properly and weak generations are rejected early.
The exact cost depends on the service and number of attempts.
How do I stop the body from changing?
Create a separate full-body master with clear proportions, simple clothing and natural perspective.
Let the face reference control identity and the body reference control the figure.
Can this workflow be used for female AI models?
Yes.
Pay particular attention to bust, waist, hips, height and leg proportions in the body master. Words such as “curvy,” “slim” and “hourglass” leave too much room for the generator to substitute its preferred body.
When should I restart from the master references?
Restart when repeated editing has changed the face, body, age or photographic treatment.
Do not keep editing an already drifted image and expect it to return to the original person.
Sources
The workflow and conclusions in this article are based on TGK’s own testing. These sources cover the official model capabilities and how LoRA training works.
- Google AI for Developers: Nano Banana image-generation documentation
- Google DeepMind: Nano Banana Pro overview
- Google DeepMind: Nano Banana 2 model information and limitations
- Hugging Face Diffusers: LoRA training guide
- Hu et al.: LoRA: Low-Rank Adaptation of Large Language Models